Onemart
- Backend
- Frontend
- User Manual - Cashier
- User Manual - Admin/Super admin/Master admin
- User manual - Master admin
Backend
Complete doc
📋 Overview
OnMart POS Backend is a full-featured RESTful API for managing retail operations. It provides comprehensive features for product management, transaction processing, inventory tracking, cashier shift management, and customer relationship management.
✨ Key Features
- 🔐 JWT Authentication & Authorization - Secure role-based access control
- 👥 Multi-Role User Management - MasterAdmin, SuperAdmin, Admin, Cashier
- 🏪 Multi-Outlet Support - Manage multiple store locations
- 📦 Product Management - Categories, brands, barcodes, and inventory
- 💰 Transaction Processing - Complete POS functionality with void/refund
- 🕐 Shift Management - Track cashier shifts and sales
- 🎁 Promotional System - Flexible discount management
- 👤 Customer Management - Customer profiles and transaction history
- 📊 Dashboard & Reporting - Sales analytics and insights
- 📄 Invoice Generation - PDF receipt printing
- 📥 Import/Export - CSV and Excel support
🚀 Quick Start
Prerequisites
- Node.js v16 or higher
- PostgreSQL v12 or higher
- npm or yarn
Installation
-
Clone the repository
git clone <repository-url> cd onmart-pos-backend -
Install dependencies
npm install -
Configure environment variables
cp .env.example .env # Edit .env with your configuration -
Set up database
# Create database createdb onmart_pos_dev # Run migrations npx sequelize-cli db:migrate # Seed initial data npx sequelize-cli db:seed:all -
Start the server
npm start
The server will be running at http://localhost:3000 🎉
Default Login Credentials
After seeding, you can log in with these accounts:
| Role | Password | |
|---|---|---|
| MasterAdmin | masteradmin@mail.com | password |
| SuperAdmin | superadmin@mail.com | password |
| Admin | admin@mail.com | password |
| Cashier | cashier@mail.com | password |
⚠️ Important: Change these passwords in production!
📚 Documentation
Comprehensive documentation is available in the /docs folder:
- Backend Documentation - Complete API reference, authentication, and development guide
- Database Documentation - Database schema, relationships, and query examples
Quick Links
🏗️ Project Structure
onmart-pos-backend/
├── config/ # Database configuration
├── controllers/ # Business logic
├── docs/ # Documentation
│ ├── BACKEND.md # Backend & API documentation
│ └── DATABASE.md # Database documentation
├── helpers/ # Utility functions
├── middlewares/ # Express middlewares
├── migrations/ # Database migrations
├── models/ # Sequelize models
├── routes/ # API routes
├── seeders/ # Database seeders
├── uploads/ # File uploads
├── utils/ # Utilities
├── index.js # Entry point
└── package.json # Dependencies
🔑 API Endpoints
Base URL: http://localhost:3000/api
Core Endpoints
| Category | Endpoint | Description |
|---|---|---|
| Auth | POST /auth/login |
User login |
| Auth | GET /auth/me |
Get current user |
| Products | GET /products |
List products |
| Products | POST /products |
Create product |
| Transactions | POST /transactions |
Create transaction |
| Cashier | POST /cashier/shifts/open |
Open shift |
| Dashboard | GET /dashboard/summary |
Dashboard stats |
For complete API documentation, see BACKEND.md.
🛠️ Tech Stack
- Runtime: Node.js
- Framework: Express v5.1.0
- Database: PostgreSQL
- ORM: Sequelize v6.37.7
- Authentication: JWT (jsonwebtoken)
- Security: Helmet, CORS, bcrypt
- File Processing: Multer, Sharp
- PDF Generation: PDFKit
- Data Processing: fast-csv, xlsx
- Logging: Morgan
🔐 Security Features
- ✅ JWT-based authentication
- ✅ Password hashing with bcrypt
- ✅ Role-based authorization
- ✅ Security headers (Helmet)
- ✅ CORS protection
- ✅ Input validation
- ✅ SQL injection prevention (Sequelize ORM)
💻 Development
Database Commands
# Run migrations
npx sequelize-cli db:migrate
# Undo last migration
npx sequelize-cli db:migrate:undo
# Run seeders
npx sequelize-cli db:seed:all
# Database reset
npx sequelize-cli db:migrate:undo:all
npx sequelize-cli db:migrate
npx sequelize-cli db:seed:all
Environment Variables
Key environment variables (see .env.example for all options):
PORT=3000
NODE_ENV=development
DB_USERNAME=postgres
DB_PASSWORD=your_password
DB_NAME=onmart_pos_dev
DB_HOST=localhost
JWT_SECRET=your_jwt_secret
ORIGIN_CORS=http://localhost:3711
📊 Database Schema
The system uses 16 tables with proper relationships:
- Users & Roles - Authentication and authorization
- Products - Inventory with categories and brands
- Transactions - Sales records with items
- Shifts - Cashier working periods
- Customers - Customer information
- Promos - Promotional campaigns
- Outlets - Store locations
For detailed schema information, see DATABASE.md.
🤝 Contributing
- Fork the repository
- Create a feature branch (
git checkout -b feature/amazing-feature) - Commit your changes (
git commit -m 'Add amazing feature') - Push to the branch (
git push origin feature/amazing-feature) - Open a Pull Request
📝 License
This project is licensed under the ISC License.
📧 Support
For questions or support:
- Open an issue in the repository
- Contact the development team
🗂️ For New Developers
If you're taking over this project, start with these documents:
- Backend Documentation - Understand the API architecture and endpoints
- Database Documentation - Learn the database structure and relationships
- Environment Setup - Follow the Quick Start guide above
- Test the API - Use the default credentials to explore the system
Recommended Reading Order
- Installation & Setup
- Database Schema Overview
- Authentication Flow
- API Endpoints Reference
- Code Structure & Organization
Version: 1.0.0
Last Updated: February 9, 2026
Frontend
Complete doc
Table of Contents
- Project Overview
- Technology Stack
- Getting Started
- Project Structure
- Features & Modules
- Authentication & Authorization
- API Integration
- Component Library
- State Management
- Routing & Navigation
- Development Guidelines
- Deployment
- Troubleshooting
Project Overview
OnMart POS Frontend is a modern Point of Sale (POS) system built for retail management. The application provides comprehensive functionality for managing sales, inventory, customers, and reporting across multiple outlets.
Key Features
- Role-based Access Control: Master Admin, Super Admin, Admin, and Cashier roles
- POS Terminal: Fast checkout and transaction processing
- Inventory Management: Products, categories, brands, and stock control
- Customer Management: Customer database and transaction history
- Reporting & Analytics: Sales reports, dashboard analytics, and transaction tracking
- Multi-outlet Support: Manage multiple store locations
- Shift Management: Cashier shift tracking and reporting
Technology Stack
Core Framework
- Next.js 15.5.12: React framework with App Router
- React 19: Latest React version
- TypeScript 5: Type-safe development
- Tailwind CSS 4: Utility-first CSS framework
UI Components & Libraries
-
Radix UI: Accessible component primitives
- Dialog, Popover, Checkbox, Separator, Slot, Tooltip
- Headless UI: Unstyled, accessible UI components
- Lucide React: Icon library
- Heroicons: Additional icon set
- shadcn/ui: Component library (New York style)
Data Fetching & State Management
- SWR 2.3.4: React Hooks for data fetching
- Axios 1.10.0: HTTP client
- React Hook Form 7.59.0: Form management
Data Visualization
- Recharts 2.15.3: Charting library for dashboard analytics
- @tanstack/react-table 8.21.3: Table management
Additional Libraries
- date-fns 4.1.0: Date manipulation
- SweetAlert2 11.22.0: Beautiful alert dialogs
- React Hot Toast 2.5.2: Toast notifications
- class-variance-authority: Dynamic class management
- clsx & tailwind-merge: Class utility functions
Development Tools
- ESLint 9: Code linting
- Turbopack: Fast bundler (Next.js dev mode)
Getting Started
Prerequisites
- Node.js 20+ installed
- npm, yarn, pnpm, or bun package manager
- Access to OnMart backend API
Installation
- Clone the repository
git clone <repository-url>
cd onmart-pos-frontend
- Install dependencies
npm install
# or
yarn install
# or
pnpm install
- Configure environment variables
Create or update .env.local file:
NEXT_PUBLIC_API_URL=http://localhost:3000/api
ORIGIN_CORS=http://localhost:3711
- Run development server
npm run dev
# or
yarn dev
The application will start on http://localhost:3711
Available Scripts
# Start development server with Turbopack
npm run dev
# Build for production
npm run build
# Start production server
npm run start
# Run ESLint
npm run lint
Project Structure
onmart-pos-frontend/
├── src/
│ ├── app/ # Next.js App Router
│ │ ├── (auth)/ # Authentication routes
│ │ │ ├── login/
│ │ │ ├── logout/
│ │ │ └── redirect/
│ │ ├── (dashboard)/ # Protected dashboard routes
│ │ │ ├── dashboard/ # Main dashboard
│ │ │ ├── products/ # Product management
│ │ │ ├── categories/ # Category management
│ │ │ ├── brands/ # Brand management
│ │ │ ├── promos/ # Promotions & discounts
│ │ │ ├── outlets/ # Outlet management
│ │ │ ├── customers/ # Customer management
│ │ │ ├── invoices/ # Invoice history
│ │ │ ├── transactions/ # Transaction reports
│ │ │ ├── posterminal/ # POS Terminal
│ │ │ ├── myshift/ # Cashier shift management
│ │ │ ├── usermanagement/# User management
│ │ │ └── accountsettings/# Account settings
│ │ ├── api/ # API routes
│ │ ├── layout.tsx # Root layout
│ │ ├── page.tsx # Home page
│ │ └── globals.css # Global styles
│ ├── components/ # React components
│ │ ├── ui/ # UI primitives
│ │ ├── icons/ # Custom icons
│ │ ├── layouts/ # Layout components
│ │ └── page.tsx # Page component
│ ├── features/ # Feature modules
│ │ ├── auth/ # Authentication
│ │ ├── products/ # Product features
│ │ ├── categories/ # Category features
│ │ ├── brands/ # Brand features
│ │ ├── promos/ # Promo features
│ │ ├── outlets/ # Outlet features
│ │ ├── customers/ # Customer features
│ │ ├── invoices/ # Invoice features
│ │ ├── transactions/ # Transaction features
│ │ ├── posTerminal/ # POS Terminal features
│ │ ├── myshift/ # Shift management
│ │ ├── userManagement/ # User management
│ │ └── accountSettings/ # Account settings
│ ├── hooks/ # Custom React hooks
│ │ └── use-mobile.ts # Mobile detection hook
│ ├── lib/ # Utility libraries
│ │ ├── api/ # API configuration
│ │ │ └── endpoints.ts # API endpoints
│ │ ├── fetchWithAuth.ts # Server-side fetch
│ │ ├── fetchWithAuthClient.ts# Client-side fetch
│ │ ├── utils.ts # Utility functions
│ │ └── alert.ts # Alert utilities
│ ├── types/ # TypeScript types
│ │ ├── product.ts # Product types
│ │ └── profile.ts # Profile types
│ └── middleware.ts # Next.js middleware
├── public/ # Static assets
├── .env.local # Environment variables
├── next.config.ts # Next.js configuration
├── tailwind.config.ts # Tailwind configuration
├── tsconfig.json # TypeScript configuration
├── components.json # shadcn/ui configuration
└── package.json # Dependencies
Directory Explanation
/src/app
Contains Next.js App Router pages and layouts. Organized with route groups:
-
(auth): Public authentication pages -
(dashboard): Protected dashboard pages
/src/components
Reusable React components:
-
ui/: Base UI components (buttons, inputs, tables, etc.) -
icons/: Custom SVG icons for navigation -
layouts/: Layout components likedashboardLayout.tsx
/src/features
Feature-specific components organized by domain:
- Each feature contains:
actions.tsx,columns.tsx,formX.tsx,listX.tsx - Follows a consistent pattern for CRUD operations
/src/lib
Utility functions and configurations:
- API endpoint definitions
- Authentication helpers
- Shared utilities
Features & Modules
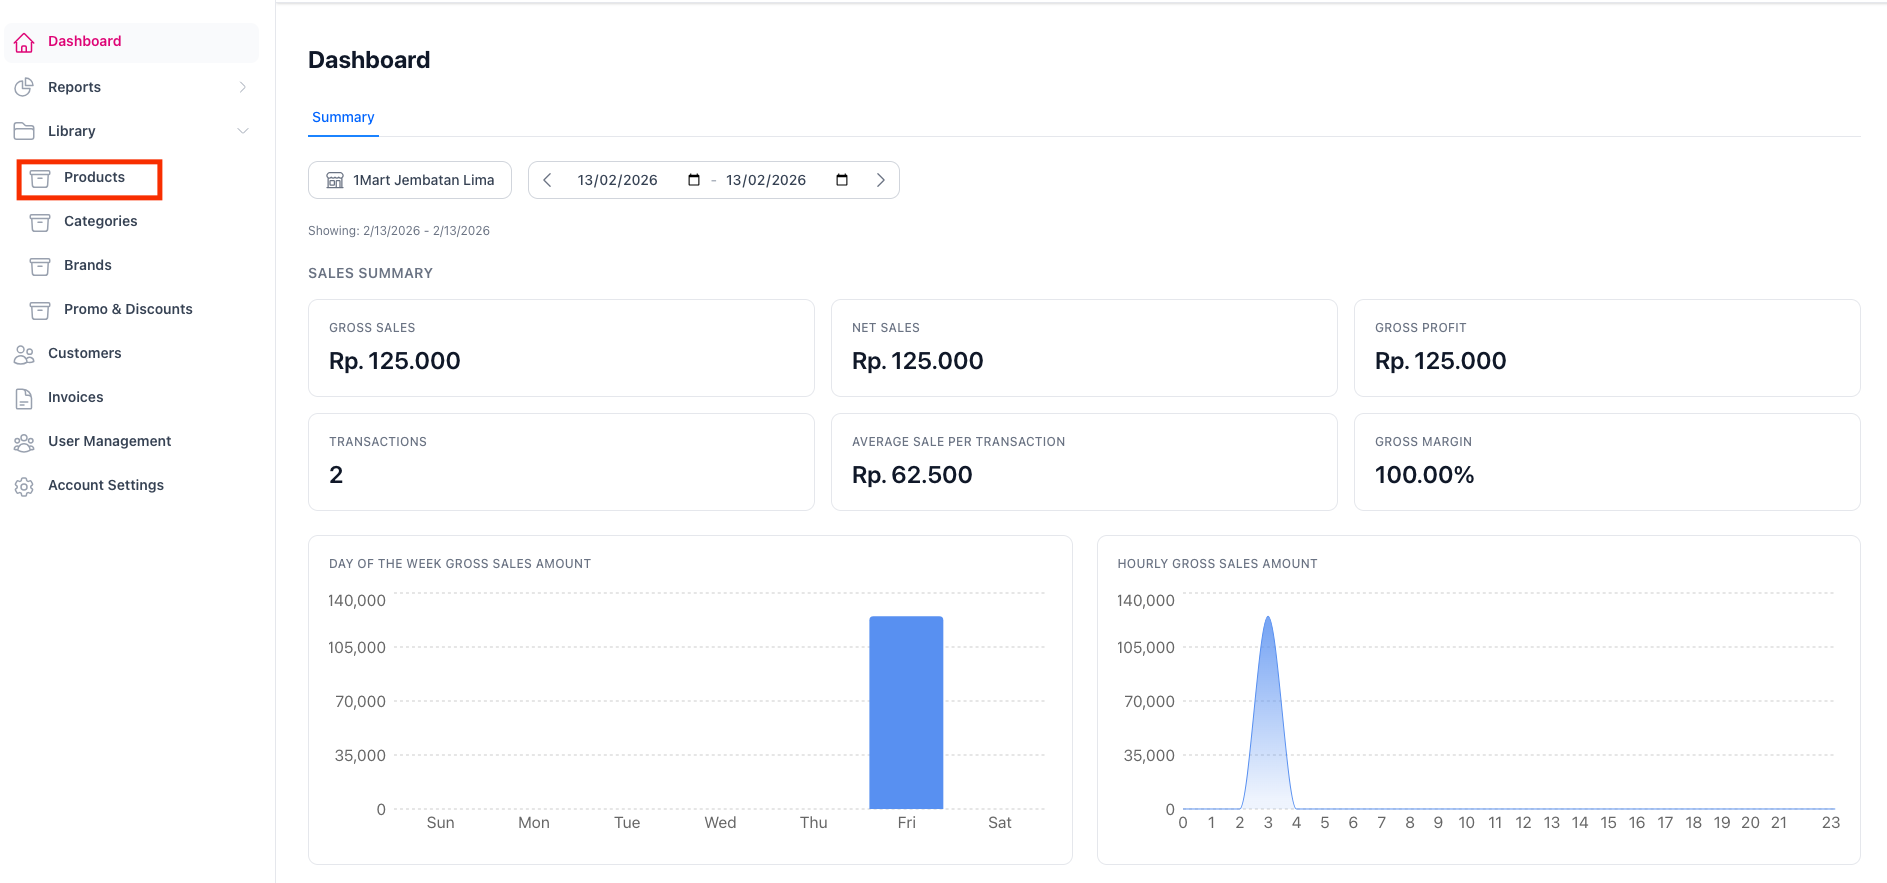
1. Dashboard
Path: /dashboard
Roles: Master Admin, Super Admin, Admin, Cashier
Features:
- Sales summary with key metrics (Gross Sales, Net Sales, Gross Profit)
- Transaction count and average sale tracking
- Day of week sales analysis (Bar chart)
- Hourly sales trends (Area chart)
- Top-selling items table
- Category analysis by volume and sales (Pie charts)
- Date range filtering
- Multi-outlet filtering
Components:
-
src/app/(dashboard)/dashboard/page.tsx - Uses Recharts for data visualization
2. POS Terminal
Path: /posterminal
Roles: Cashier
Features:
- Product search and barcode scanning
- Shopping cart management
- Customer selection
- Payment processing
- Multiple payment methods
- Receipt generation
- Shift management integration
Components:
-
src/features/posTerminal/productSearch.tsx -
src/features/posTerminal/cartItemList.tsx -
src/features/posTerminal/customerModal.tsx -
src/features/posTerminal/formPosTerminal.tsx -
src/features/posTerminal/openShiftModal.tsx
3. Product Management
Path: /products
Roles: Master Admin, Super Admin, Admin
Features:
- Product CRUD operations
- Product listing with search and filters
- Stock management
- Category and brand assignment
- Barcode management
- Bulk import (CSV/Excel)
- Export functionality
Components:
-
src/features/products/listProducts.tsx -
src/features/products/formProduct.tsx -
src/features/products/columns.tsx -
src/features/products/actions.tsx
API Endpoints:
- GET
/api/products- List products - POST
/api/products- Create product - PUT
/api/products/:id- Update product - DELETE
/api/products/:id- Delete product - POST
/api/products/import-csv- Import CSV - POST
/api/products/import-excel- Import Excel - GET
/api/products/export-csv- Export CSV
4. Category Management
Path: /categories
Roles: Master Admin, Super Admin, Admin
Features:
- Category CRUD operations
- Category listing
- Product count per category
Components:
-
src/features/categories/listCategory.tsx -
src/features/categories/formCategory.tsx -
src/features/categories/columns.tsx
5. Brand Management
Path: /brands
Roles: Master Admin, Super Admin, Admin
Features:
- Brand CRUD operations
- Brand listing
- Product count per brand
Components:
-
src/features/brands/formBrand.tsx -
src/features/brands/columns.tsx
6. Promotions & Discounts
Path: /promos
Roles: Master Admin, Super Admin, Admin
Features:
- Promo/discount creation and management
- Discount rules configuration
- Active/inactive status management
7. Outlet Management
Path: /outlets
Roles: Master Admin, Super Admin
Features:
- Multiple store location management
- Outlet-specific inventory
- Per-outlet reporting
8. Customer Management
Path: /customers
Roles: All roles
Features:
- Customer database
- Customer information management
- Purchase history
- Customer search
Components:
-
src/features/customers/(contains customer CRUD components)
9. Invoice Management
Path: /invoices
Roles: All roles
Features:
- Invoice history
- Invoice details view
- Invoice search and filtering
- Invoice printing
Components:
-
src/features/invoices/(contains invoice list and detail views)
10. Transaction Reports
Path: /transactions
Roles: Master Admin, Super Admin, Admin
Features:
- Transaction history
- Advanced filtering (date, outlet, status)
- Transaction void functionality
- Transaction refund functionality
- Export capabilities
Components:
-
src/features/transactions/(contains transaction reports)
API Endpoints:
- GET
/api/transactions- List transactions - GET
/api/transactions/:id/invoice- Get invoice details - PATCH
/api/transactions/:id/void- Void transaction - PATCH
/api/transactions/:id/refund- Refund transaction
11. My Shift
Path: /myshift
Roles: Cashier
Features:
- Shift start/end tracking
- Shift summary
- Cash reconciliation
- Shift history
Components:
-
src/features/myshift/listMyshift.tsx -
src/features/myshift/formMyShift.tsx -
src/features/myshift/columns.tsx
12. User Management
Path: /usermanagement
Roles: Master Admin, Super Admin, Admin
Features:
- User CRUD operations
- Role assignment
- User status management
- Password management
Components:
-
src/features/userManagement/listUser.tsx -
src/features/userManagement/formUser.tsx -
src/features/userManagement/columns.tsx
13. Account Settings
Path: /accountsettings
Roles: All roles
Features:
- Profile information
- Password change
- User preferences
Components:
-
src/features/auth/accountPage.tsx
Authentication & Authorization
Authentication Flow
-
Login Process
- User enters credentials on
/login -
loginActionvalidates credentials with backend - On success, JWT token is stored in cookies
- User profile is stored in cookies
- Redirect to
/redirectthen to appropriate dashboard
- User enters credentials on
-
Token Management
- Access token stored in
access_tokencookie - Profile data stored in
profilecookie - "Remember Me" extends cookie lifetime to 7 days
- Token is automatically included in API requests
- Access token stored in
-
Logout Process
-
/logoutpage calls logout API - Clears cookies
- Redirects to
/login
-
Middleware Protection
File: src/middleware.ts
// Public routes accessible without authentication
const publicRoutes = ["/login", "/auth/redirect"];
// Logic:
// - If logged in + accessing public route → redirect to /dashboard
// - If not logged in + accessing private route → redirect to /login
Protected Routes:
- All routes except
/loginand/auth/redirectrequire authentication - Static files (
/_next/static, images, etc.) are excluded from middleware
Role-Based Navigation
File: src/components/layouts/dashboardLayout.tsx
Master Admin
- Dashboard
- Reports (Transactions)
- Library (Products, Categories, Brands, Promos)
- Outlets
- Customers
- Invoices
- User Management
- Account Settings
Super Admin / Admin
- Dashboard
- Reports (Transactions)
- Library (Products, Categories, Brands, Promos)
- Customers
- Invoices
- User Management
- Account Settings
Cashier
- Customers
- My Shift
- POS Terminal
- Invoices
- Account Settings
Authentication Helpers
Client-Side Fetch
File: src/lib/fetchWithAuthClient.ts
// Automatically adds Authorization header from localStorage
const fetchWithAuthClient = async (input, init) => {
const token = localStorage.getItem("access_token");
headers.set("Authorization", `Bearer ${token}`);
return fetch(input, { ...init, headers });
};
Server-Side Fetch
File: src/lib/fetchWithAuth.ts
For server components and API routes with cookie-based authentication.
API Integration
Base URL Configuration
File: src/lib/api/endpoints.ts
// Production API
const baseUrl = "https://posapi.onemart.id/api";
// For local development, uncomment:
// const baseUrl = "http://localhost:3710/api";
API Endpoints
All endpoints are defined in src/lib/api/endpoints.ts:
Authentication
-
POST /api/auth/login- User login -
POST /api/auth/logout- User logout -
GET /api/auth/me- Get current user -
PUT /api/auth/me/password- Change password
Products
-
GET /api/products- List products -
POST /api/products- Create product -
PUT /api/products/:id- Update product -
DELETE /api/products/:id- Delete product -
POST /api/products/import-csv- Import CSV -
POST /api/products/import-excel- Import Excel -
GET /api/products/export-csv- Export CSV
Categories
-
GET /api/categories- List categories -
POST /api/categories- Create category -
PUT /api/categories/:id- Update category -
DELETE /api/categories/:id- Delete category
Brands
-
GET /api/brands- List brands -
POST /api/brands- Create brand -
PUT /api/brands/:id- Update brand -
DELETE /api/brands/:id- Delete brand
Promotions
-
GET /api/promos- List promotions -
POST /api/promos- Create promotion -
PUT /api/promos/:id- Update promotion -
DELETE /api/promos/:id- Delete promotion
Outlets
-
GET /api/outlets- List outlets -
POST /api/outlets- Create outlet -
PUT /api/outlets/:id- Update outlet -
DELETE /api/outlets/:id- Delete outlet
Customers
-
GET /api/customers- List customers -
POST /api/customers- Create customer -
PUT /api/customers/:id- Update customer -
DELETE /api/customers/:id- Delete customer
Payment Methods
-
GET /api/payment-methods- List payment methods
Shifts
-
GET /api/cashier/shifts- List shifts -
POST /api/cashier/shifts- Start shift -
PUT /api/cashier/shifts/:id- End shift
Transactions
-
GET /api/transactions- List transactions -
GET /api/transactions/:id/invoice- Get invoice details -
PATCH /api/transactions/:id/void- Void transaction -
PATCH /api/transactions/:id/refund- Refund transaction
Dashboard
-
GET /api/dashboard/summary- Dashboard summary- Query params:
dateStart,dateEnd,outletId
- Query params:
Users
-
GET /api/users- List users -
POST /api/users- Create user -
PUT /api/users/:id- Update user -
DELETE /api/users/:id- Delete user
Roles
-
GET /api/roles- List roles
Making API Calls
Using SWR (Recommended for GET requests)
import useSWR from 'swr';
import { fetchWithAuthClient } from '@/lib/fetchWithAuthClient';
import endpoints from '@/lib/api/endpoints';
const { data, error, isLoading, mutate } = useSWR(
endpoints.product.url,
fetchWithAuthClient
);
Using Axios
import axios from 'axios';
import endpoints from '@/lib/api/endpoints';
const response = await axios({
url: endpoints.product.url,
method: endpoints.product.method,
headers: {
Authorization: `Bearer ${token}`,
},
data: productData,
});
Using fetch directly
import { fetchWithAuthClient } from '@/lib/fetchWithAuthClient';
import endpoints from '@/lib/api/endpoints';
const response = await fetchWithAuthClient(
endpoints.product.url,
{
method: 'POST',
body: JSON.stringify(productData),
headers: {
'Content-Type': 'application/json',
},
}
);
Component Library
UI Components
The application uses shadcn/ui components with Radix UI primitives.
Location: src/components/ui/
Available Components
Custom Icons
Location: src/components/icons/
Custom SVG icons for navigation:
-
bar-chart.tsx- Dashboard icon -
customers.tsx- Customers icon -
inventory.tsx- Inventory icon -
invoices.tsx- Invoices icon -
library.tsx- Library icon -
myShift.tsx- Shift management icon -
pos-terminal.tsx- POS terminal icon -
product-lookup.tsx- Product lookup icon -
reports.tsx- Reports icon -
user-management.tsx- User management icon
Layout Components
DashboardLayout (src/components/layouts/dashboardLayout.tsx)
- Main application layout
- Responsive sidebar
- Role-based navigation
- User profile dropdown
- Mobile-friendly hamburger menu
State Management
Data Fetching with SWR
The application uses SWR for efficient data fetching and caching.
Benefits:
- Automatic revalidation
- Built-in caching
- Optimistic UI updates
- Real-time data synchronization
Example:
import useSWR from 'swr';
import { fetchWithAuthClient } from '@/lib/fetchWithAuthClient';
function ProductList() {
const { data, error, isLoading, mutate } = useSWR(
'/api/products',
fetchWithAuthClient
);
// mutate() - manually revalidate
// data - response data
// error - error object
// isLoading - loading state
}
Form State with React Hook Form
Forms use React Hook Form for validation and state management.
Example:
import { useForm } from 'react-hook-form';
function ProductForm() {
const { register, handleSubmit, formState: { errors } } = useForm();
const onSubmit = async (data) => {
// Handle form submission
};
return (
<form onSubmit={handleSubmit(onSubmit)}>
<input {...register('name', { required: true })} />
{errors.name && <span>This field is required</span>}
</form>
);
}
Local State
Component-level state is managed with React hooks:
-
useState- Local state -
useEffect- Side effects -
useMemo- Memoized values -
useCallback- Memoized callbacks
Routing & Navigation
App Router Structure
Next.js 15 uses the App Router with file-based routing.
Route Groups:
-
(auth)- Authentication pages (public) -
(dashboard)- Dashboard pages (protected)
Navigation Methods
Link Component
import Link from 'next/link';
<Link href="/products">Products</Link>
useRouter Hook
import { useRouter } from 'next/navigation';
const router = useRouter();
router.push('/dashboard');
router.back();
router.refresh();
Redirect Function
import { redirect } from 'next/navigation';
redirect('/login'); // Server-side redirect
Dynamic Routes
/transactions/[id] - Transaction detail page
/products/[id]/edit - Edit product page
Development Guidelines
Code Organization
-
Feature-based Structure
- Group related components in feature folders
- Each feature has consistent file naming:
listX.tsx,formX.tsx,columns.tsx,actions.tsx
-
Component Naming
- PascalCase for components:
ProductList,CategoryForm - camelCase for functions and variables:
fetchProducts,productData - kebab-case for files:
product-list.tsx
- PascalCase for components:
-
Type Definitions
- Define types in
src/types/ - Use interfaces for objects with properties
- Export types from feature modules
- Define types in
Styling Guidelines
-
Tailwind CSS
- Use Tailwind utility classes
- Avoid inline styles
- Use
classNamefor styling
-
Custom Colors
- Brand colors defined in
next.config.ts:-
brand-primary: #f45b8c -
brand-hover: #e04a7a -
brand-bg: #ffeef2 -
brand-bgSecondary: #fdd9e5 -
text-muted: #6b7280
-
- Brand colors defined in
-
Responsive Design
- Mobile-first approach
- Use Tailwind breakpoints:
sm:,md:,lg:,xl:,2xl:
TypeScript Best Practices
-
Type Safety
- Always define types for props
- Avoid
anytype - Use type inference where possible
-
Interfaces vs Types
- Prefer interfaces for object shapes
- Use types for unions and intersections
-
Path Aliases
- Use
@/prefix for imports - Examples:
@/components/ui/button,@/lib/utils
- Use
Error Handling
-
API Errors
- Handle 401 (Unauthorized) → redirect to login
- Show user-friendly error messages
- Use SweetAlert2 or React Hot Toast
-
Form Validation
- Use React Hook Form validation
- Display inline error messages
-
Loading States
- Show skeletons or spinners
- Disable buttons during submission
Performance Optimization
-
Code Splitting
- Use dynamic imports for large components
- Leverage Next.js automatic code splitting
-
Image Optimization
- Use Next.js
<Image>component - Optimize images before uploading
- Use Next.js
-
Memoization
- Use
useMemofor expensive calculations - Use
useCallbackfor event handlers
- Use
-
Data Fetching
- Use SWR for automatic caching
- Implement pagination for large lists
Testing (Future)
While testing infrastructure is not currently set up, consider:
- Unit tests with Jest
- Component tests with React Testing Library
- E2E tests with Playwright or Cypress
Deployment
Build Process
- Production Build
npm run build
This creates an optimized production build in .next/ directory.
- Start Production Server
npm run start
Runs on port 3711 by default.
Environment Variables
Production:
NEXT_PUBLIC_API_URL=https://posapi.onemart.id/api
ORIGIN_CORS=https://pos.onemart.id
Staging:
NEXT_PUBLIC_API_URL=https://staging-posapi.onemart.id/api
ORIGIN_CORS=https://staging-pos.onemart.id
Development:
NEXT_PUBLIC_API_URL=http://localhost:3710/api
ORIGIN_CORS=http://localhost:3711
Deployment Platforms
Vercel (Recommended)
- Connect GitHub repository
- Configure environment variables
- Deploy automatically on push
Docker
FROM node:20-alpine
WORKDIR /app
COPY package*.json ./
RUN npm ci
COPY . .
RUN npm run build
EXPOSE 3711
CMD ["npm", "start"]
Traditional Server
- Build the application
- Copy
.next/,public/,node_modules/,package.json - Run with PM2 or similar process manager
pm2 start npm --name "onmart-pos" -- start
API URL Configuration
Change API endpoint in: src/lib/api/endpoints.ts
// Production
const baseUrl = "https://posapi.onemart.id/api";
// Development
// const baseUrl = "http://localhost:3710/api";
Pre-deployment Checklist
- Update API URL in
endpoints.ts - Set correct environment variables
- Test all features in staging
- Run build successfully (
npm run build) - Check for TypeScript errors (
npm run lint) - Verify authentication flows
- Test role-based access control
- Check responsive design on mobile devices
Troubleshooting
Common Issues
1. Authentication Issues
Problem: "Sesi Anda telah habis" or automatic logout
Solutions:
- Check if backend API is running
- Verify
access_tokencookie exists - Check token expiration
- Ensure middleware is not blocking routes
Debug:
// Check token in browser console
document.cookie.split(';').find(c => c.includes('access_token'))
2. API Connection Errors
Problem: "Failed to fetch" or CORS errors
Solutions:
- Verify API URL in
endpoints.ts - Check CORS configuration on backend
- Ensure API server is running
- Check network connectivity
Debug:
// Test API directly
fetch('https://posapi.onemart.id/api/auth/me', {
headers: { Authorization: 'Bearer YOUR_TOKEN' }
})
3. Build Errors
Problem: Build fails with TypeScript errors
Solutions:
- Run
npm run lintto identify issues - Check for missing type definitions
- Ensure all imports are correct
- Verify
tsconfig.jsonis valid
4. Port Already in Use
Problem: Port 3711 is already in use
Solutions:
# Kill process on port 3711
lsof -ti:3711 | xargs kill -9
# Or use a different port
npm run dev -- -p 3712
5. Environment Variables Not Loading
Problem: API calls fail or incorrect URLs
Solutions:
- Ensure
.env.localexists in root directory - Restart dev server after changing env variables
- Check variable names start with
NEXT_PUBLIC_for client-side access - Verify no typos in variable names
6. Styling Issues
Problem: Tailwind classes not working
Solutions:
- Clear
.next/cache:rm -rf .next - Rebuild:
npm run build - Check Tailwind configuration in
next.config.ts - Verify
@tailwindcss/postcssplugin is installed
7. SWR Not Updating
Problem: Data not refreshing after mutation
Solutions:
// Manually revalidate
mutate('/api/products');
// Revalidate with new data
mutate('/api/products', newData, false);
// Global revalidation
import { mutate } from 'swr';
mutate(() => true); // Revalidate all
Getting Help
- Check Console: Open browser DevTools and check for error messages
- Check Network: Review API calls in Network tab
- Check Logs: Check terminal for server-side errors
- Documentation: Review this documentation
- Backend Team: Contact backend team for API issues
Glossary
- POS: Point of Sale - system for processing transactions
- SKU: Stock Keeping Unit - unique product identifier
- JWT: JSON Web Token - authentication token format
- CRUD: Create, Read, Update, Delete operations
- SWR: Stale-While-Revalidate - data fetching strategy
- SSR: Server-Side Rendering
- CSR: Client-Side Rendering
- ISR: Incremental Static Regeneration
Additional Resources
External Documentation
- Next.js Documentation
- React Documentation
- Tailwind CSS
- TypeScript Handbook
- SWR Documentation
- React Hook Form
- Radix UI
- shadcn/ui
Internal Resources
- Backend API Documentation (if available)
- Design System Guidelines (if available)
- API Postman Collection (if available)
Changelog
Version 0.1.0 (Current)
- Initial release
- Core POS functionality
- Dashboard analytics
- User management
- Multi-role support
- Multi-outlet support
License
This project is proprietary and confidential. All rights reserved by OnMart/OnIndonesia.
Contact & Support
For questions or support:
- Development Team: [Contact Information]
- Backend API Issues: [Backend Team Contact]
- Infrastructure: [DevOps Team Contact]
Document Version: 1.0
Last Updated: February 2026
Maintained By: Development Team
User Manual - Cashier
Shift
- Berikut tampilan kasir sebelum user buka shift

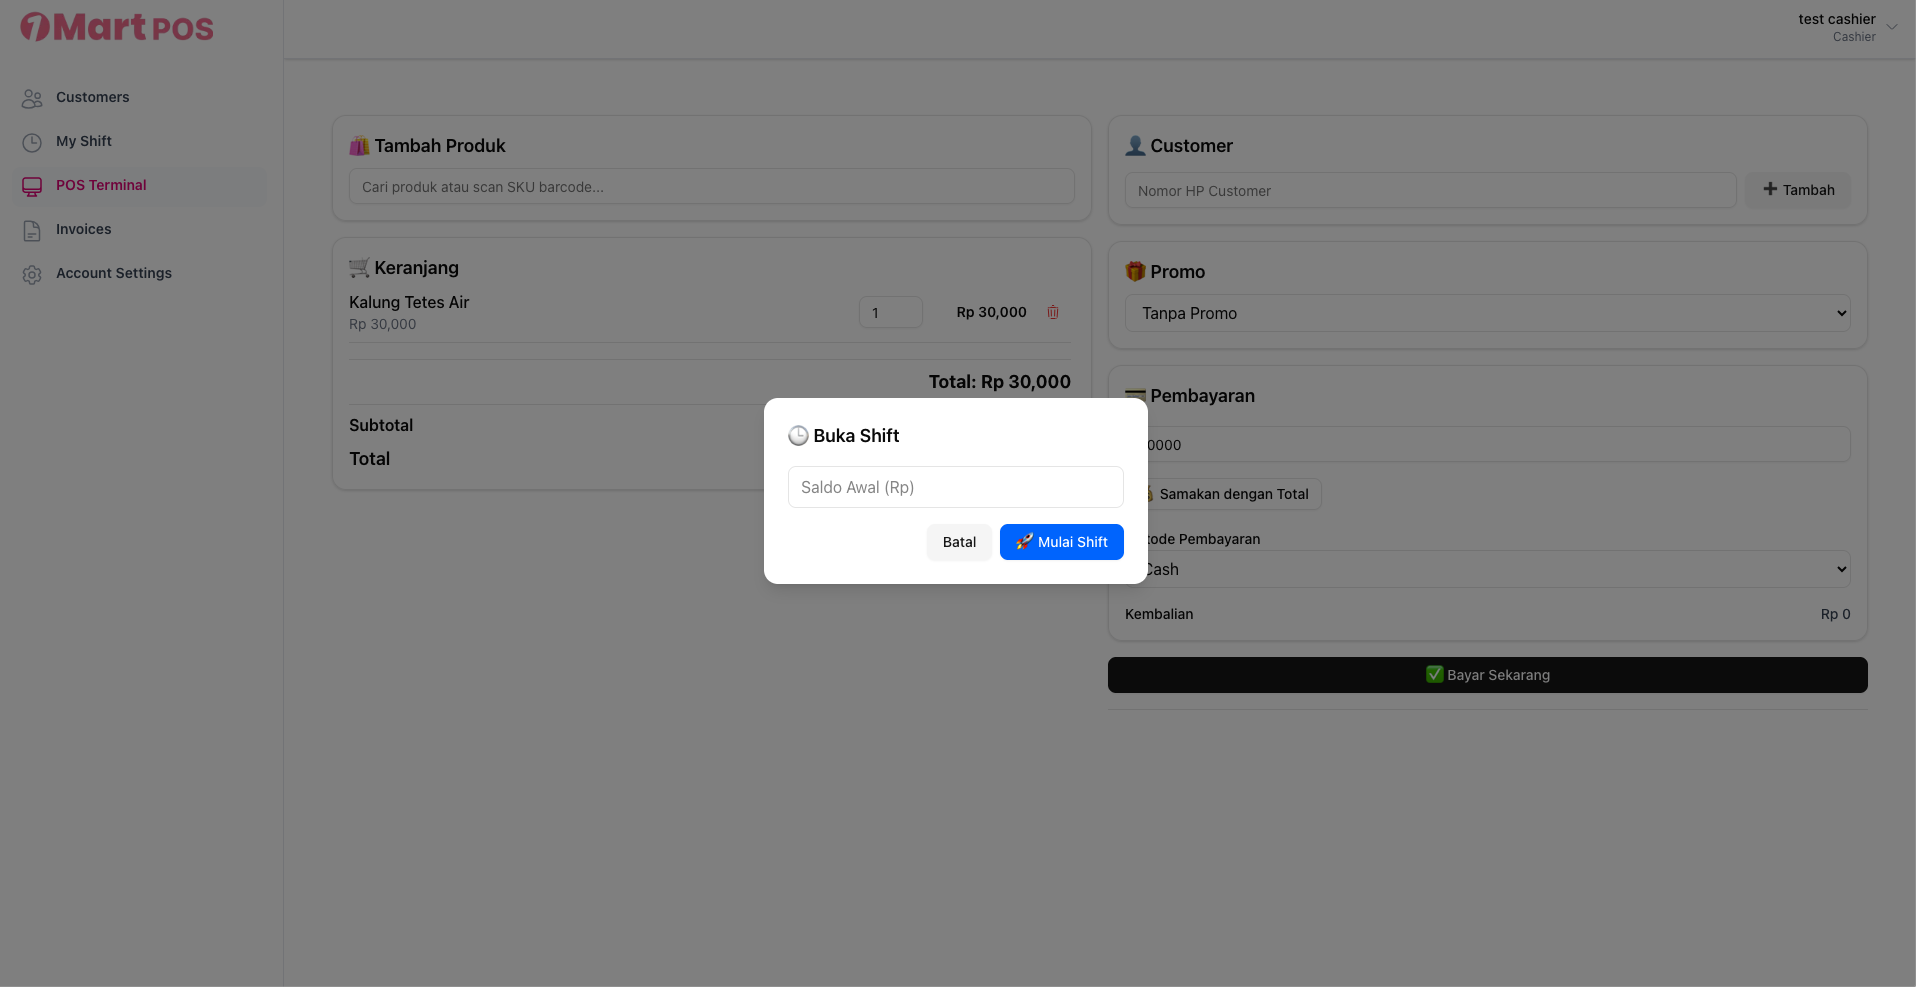
2. Silahkan isi saldo awal hari sebelum transaksi dimulai (jumlah cash fisik di kasir)
3. Berikut tampilan kasir setelah shift dimulai
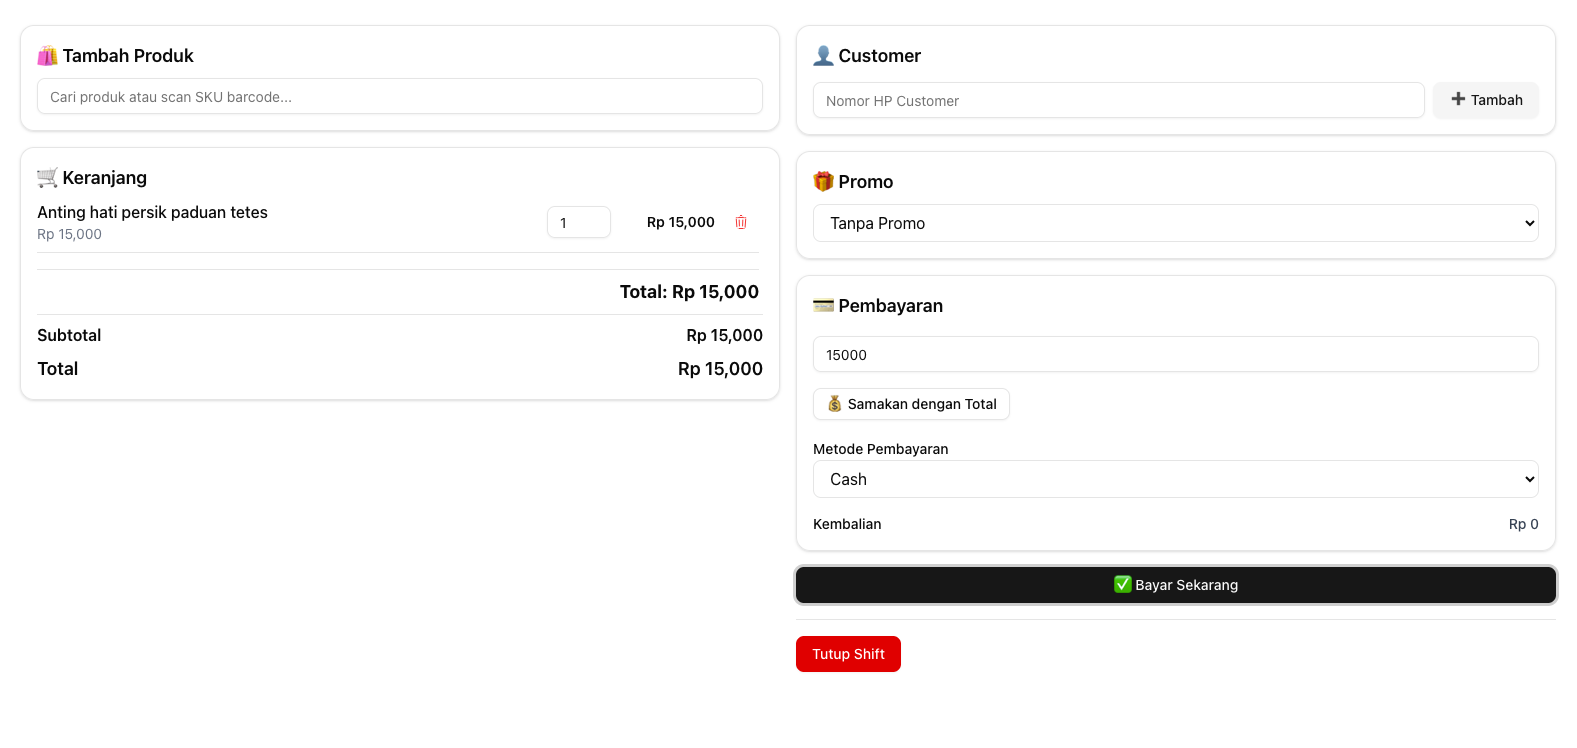
Note: terdapat tombol tutup shift jika user sudah membuka shift atau memulai transaksi
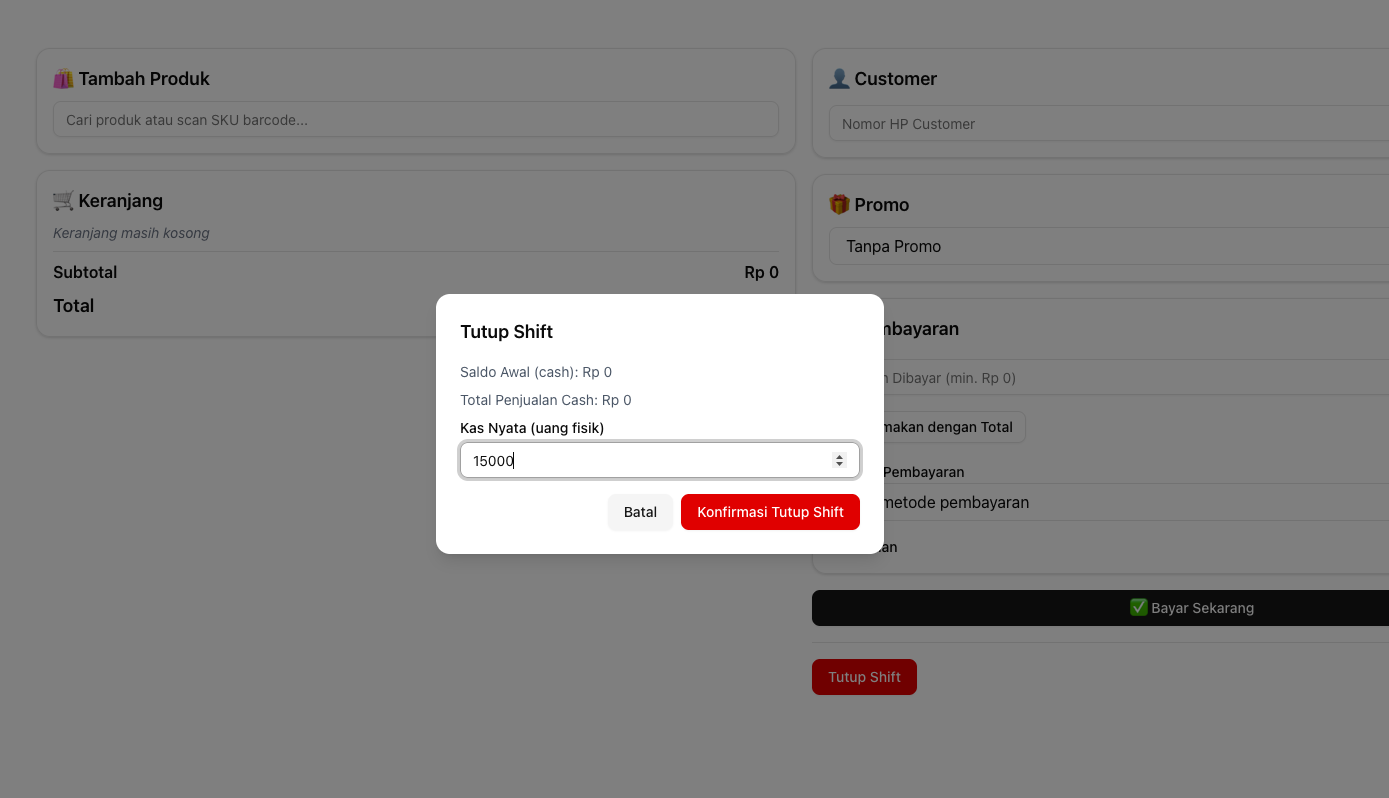
4. Tekan tombol Tutup Shift jika user sudah menyelesaikan shift dan isi jumlah saldo kas fisik
Transaction
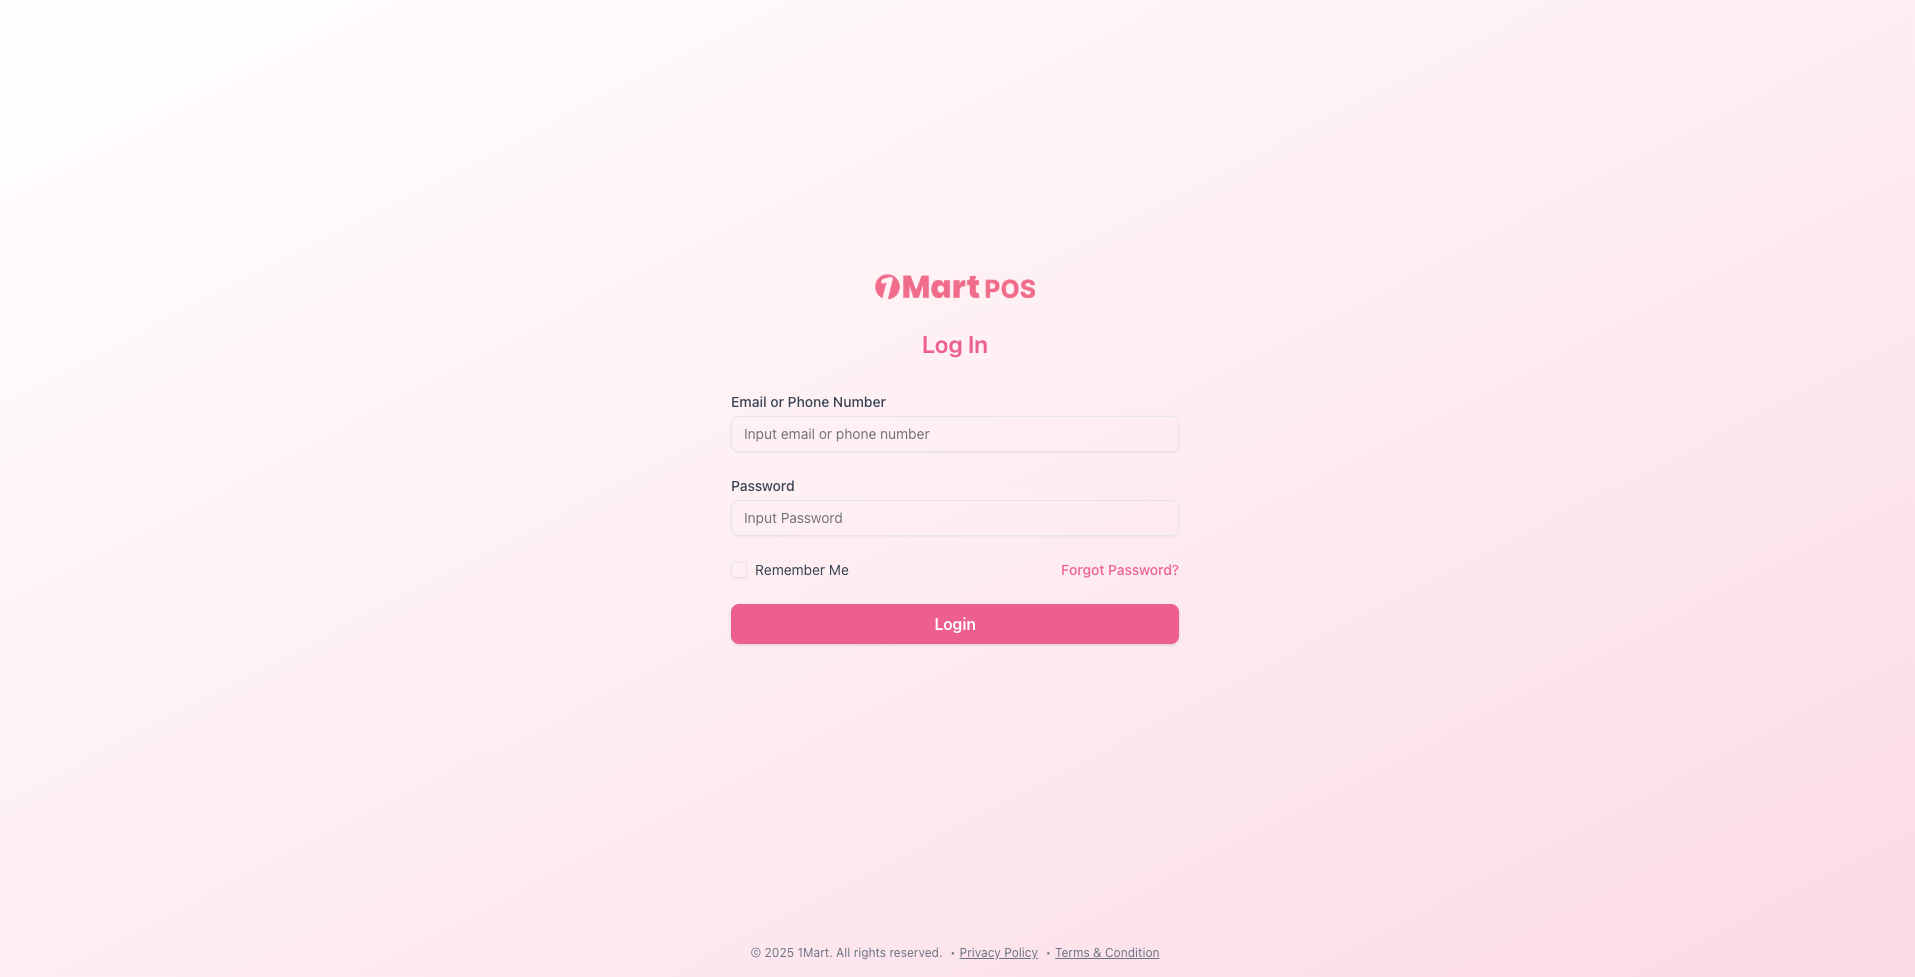
- Login web pos.onemart.id di browser sebagai kasir
2. Tampilan utama untuk kasir
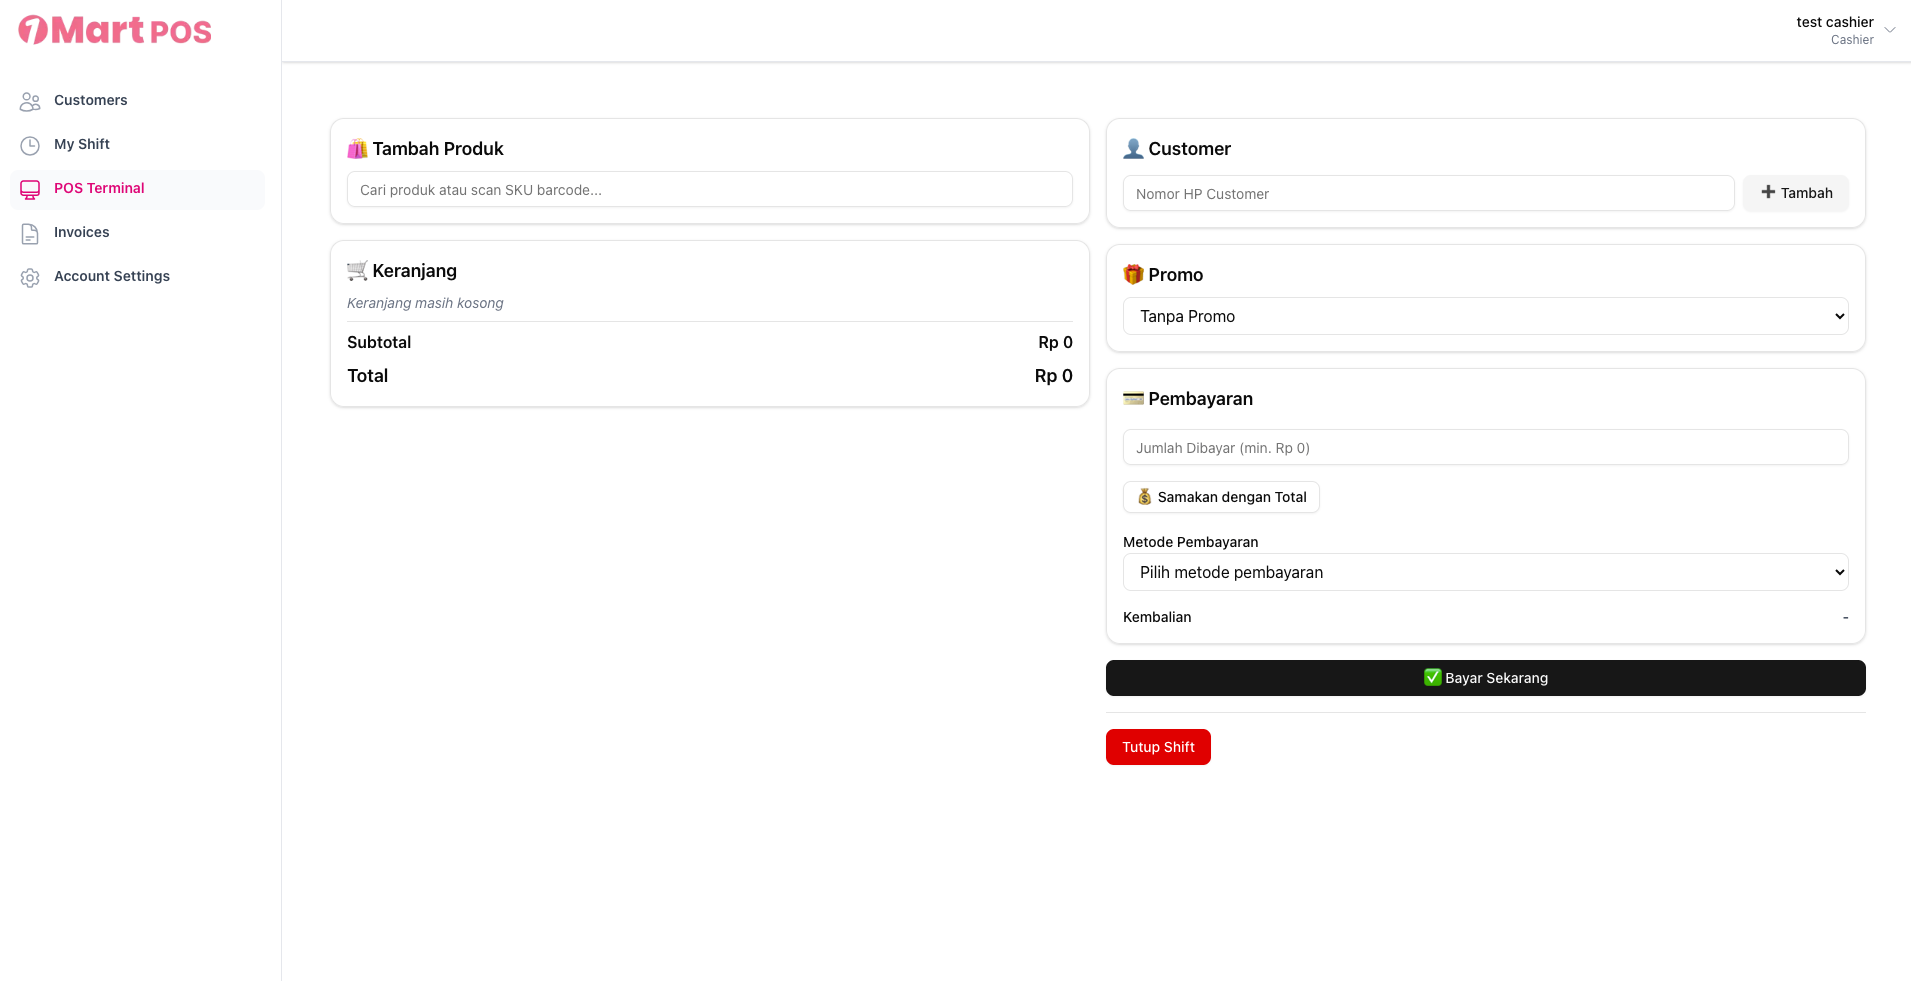
3. Scan barcode produk dengan scanner untuk menambah produk yang ingin dibeli
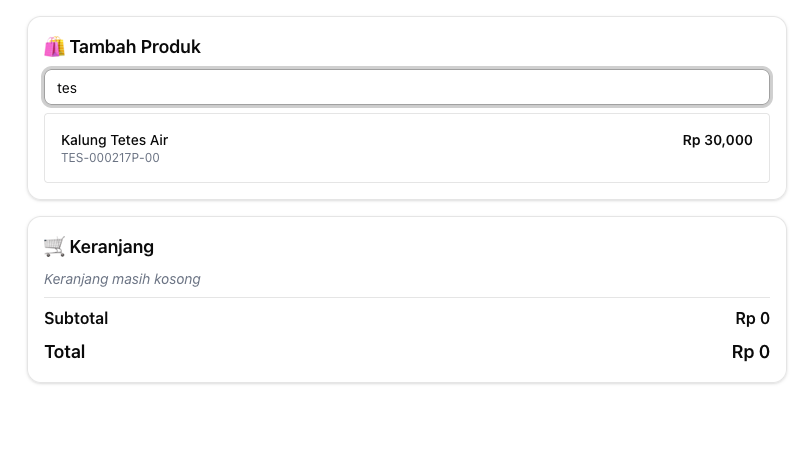
note: Tampilan untuk mencari produk secara manual
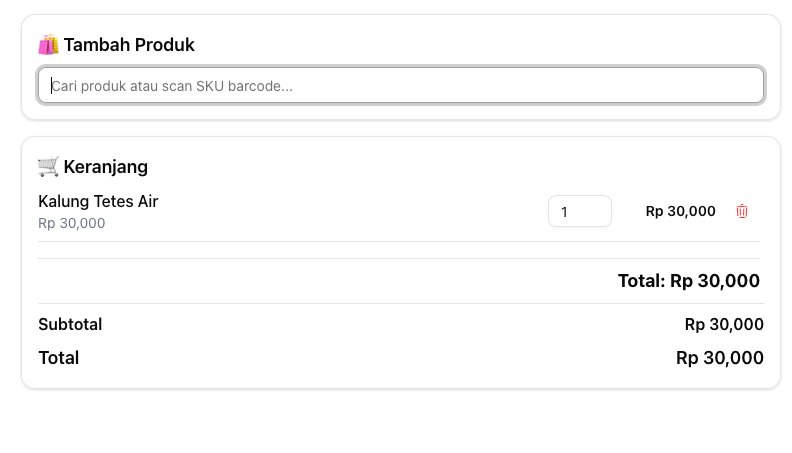
4. Kemudian, isi nominal pembayaran dan metode pembayaran. Tambahkan nomor HP Customer untuk menyimpan infomrasi customer dan pilih promo jika ada (kolom customer dan promo bersifat opsional)
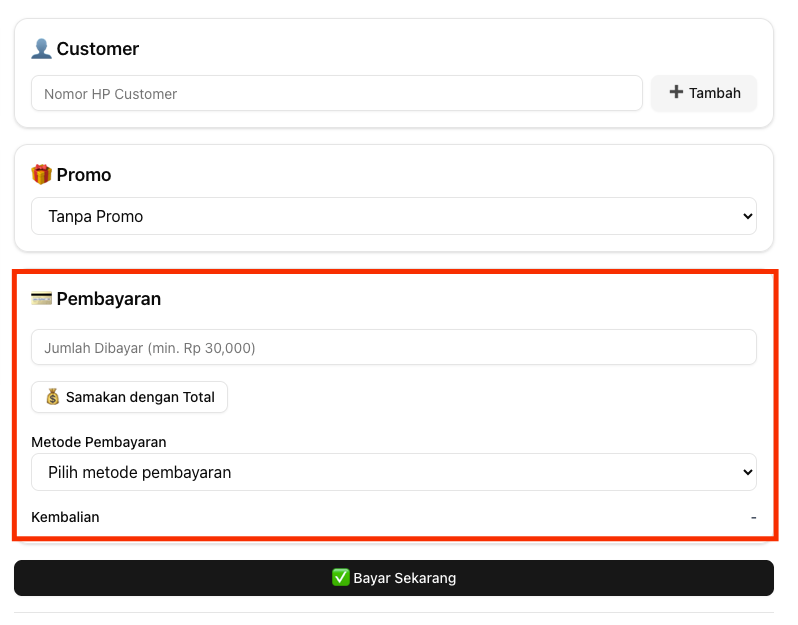
Form kotak merah bersifat wajib
5. Setelah transaksi,invoice berikut akan muncul dan otomatis diarahkan ke halaman print browser
tampilan invoice
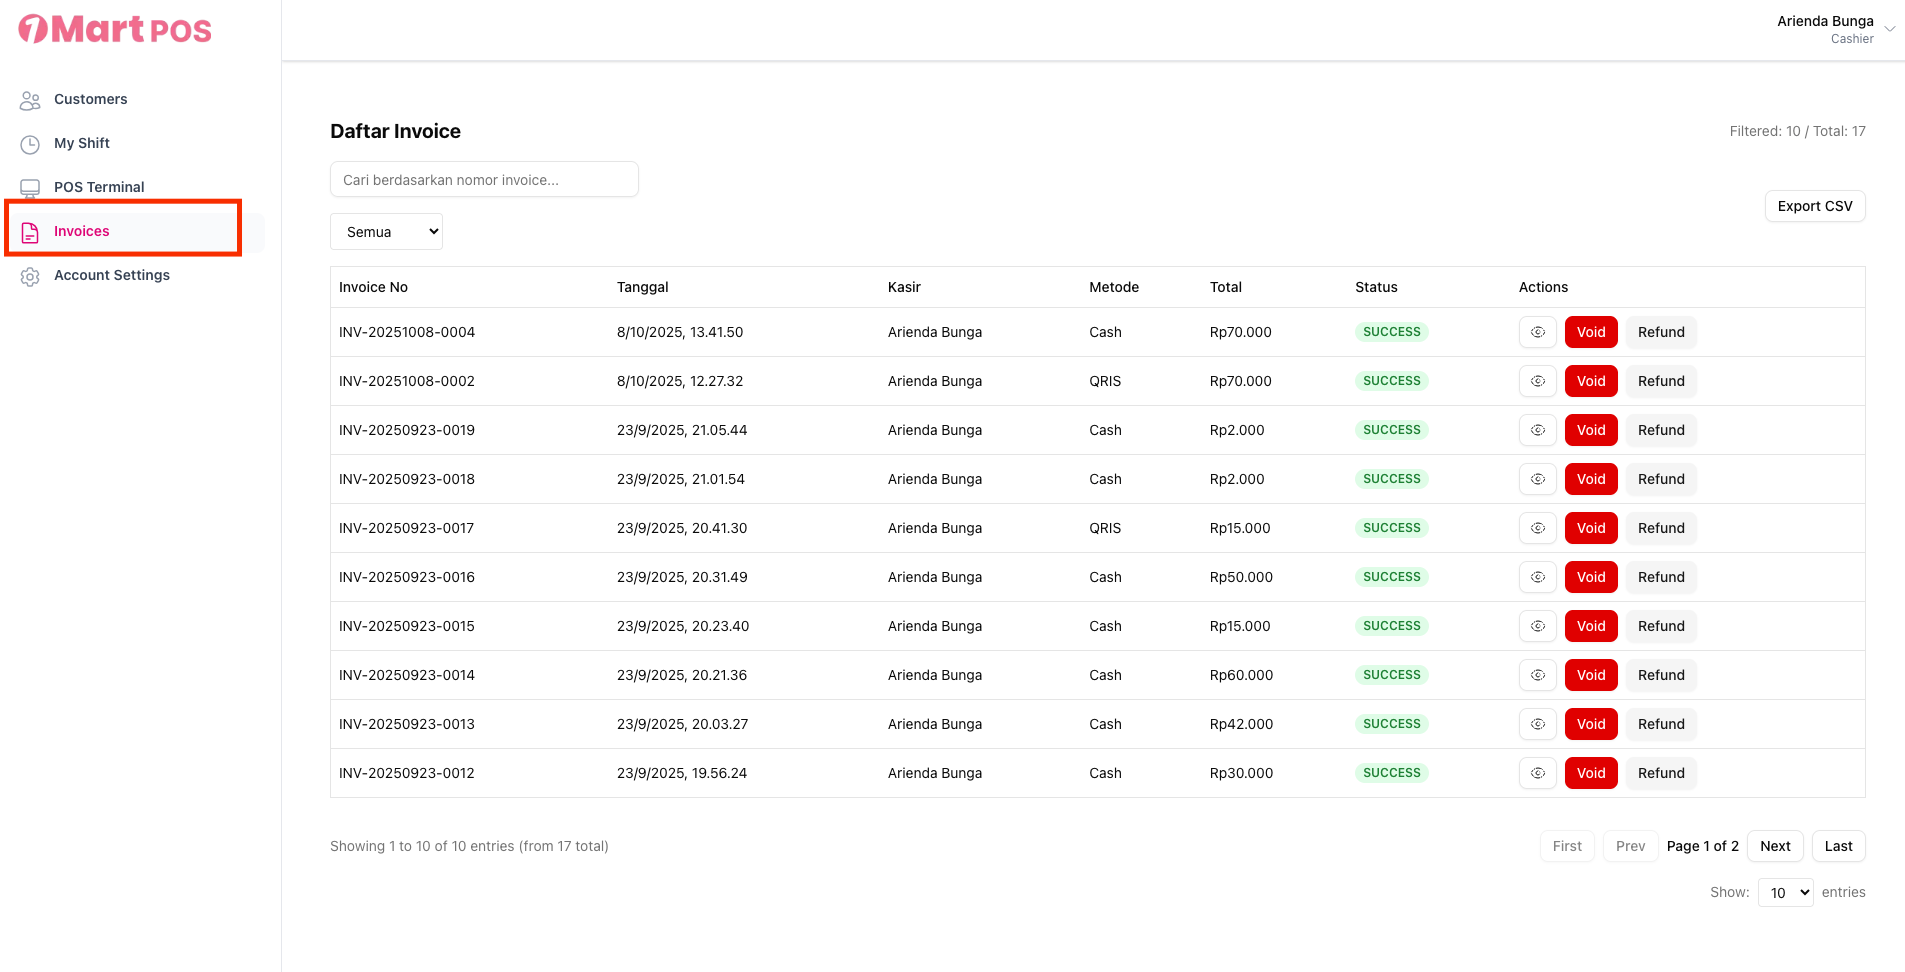
6. Jika ingin melihat histori transaksi, klik menu Invoices di sidebar sebelah kiri
User Manual - Admin/Super admin/Master admin
Manuals for Admin, Super admin, and Master admin
Report transaction
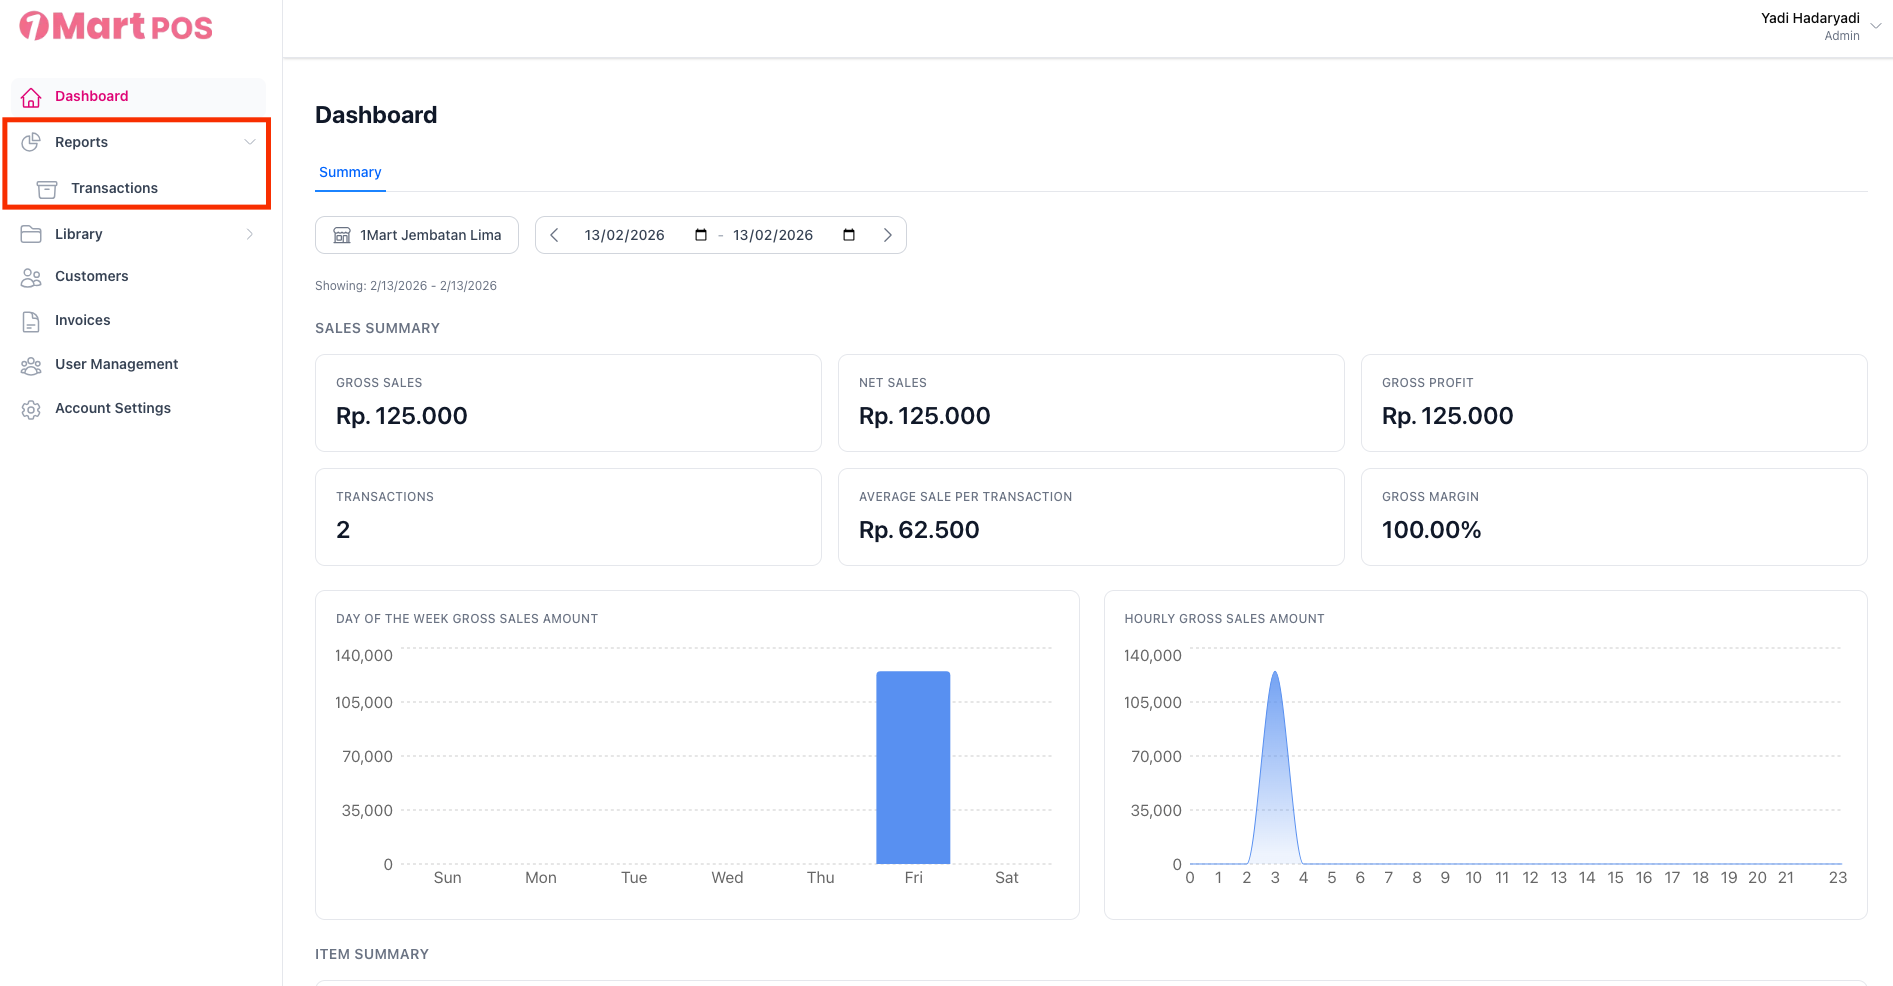
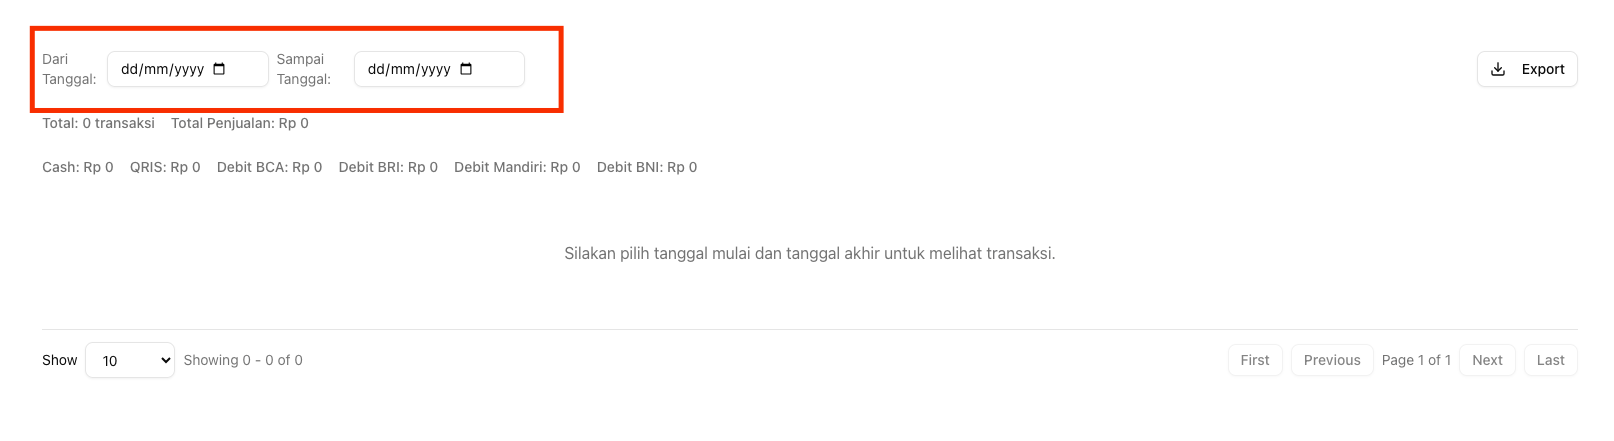
- Untuk export transaksi, silahkan klik report > transactions di sebelah kiri menu sidebar
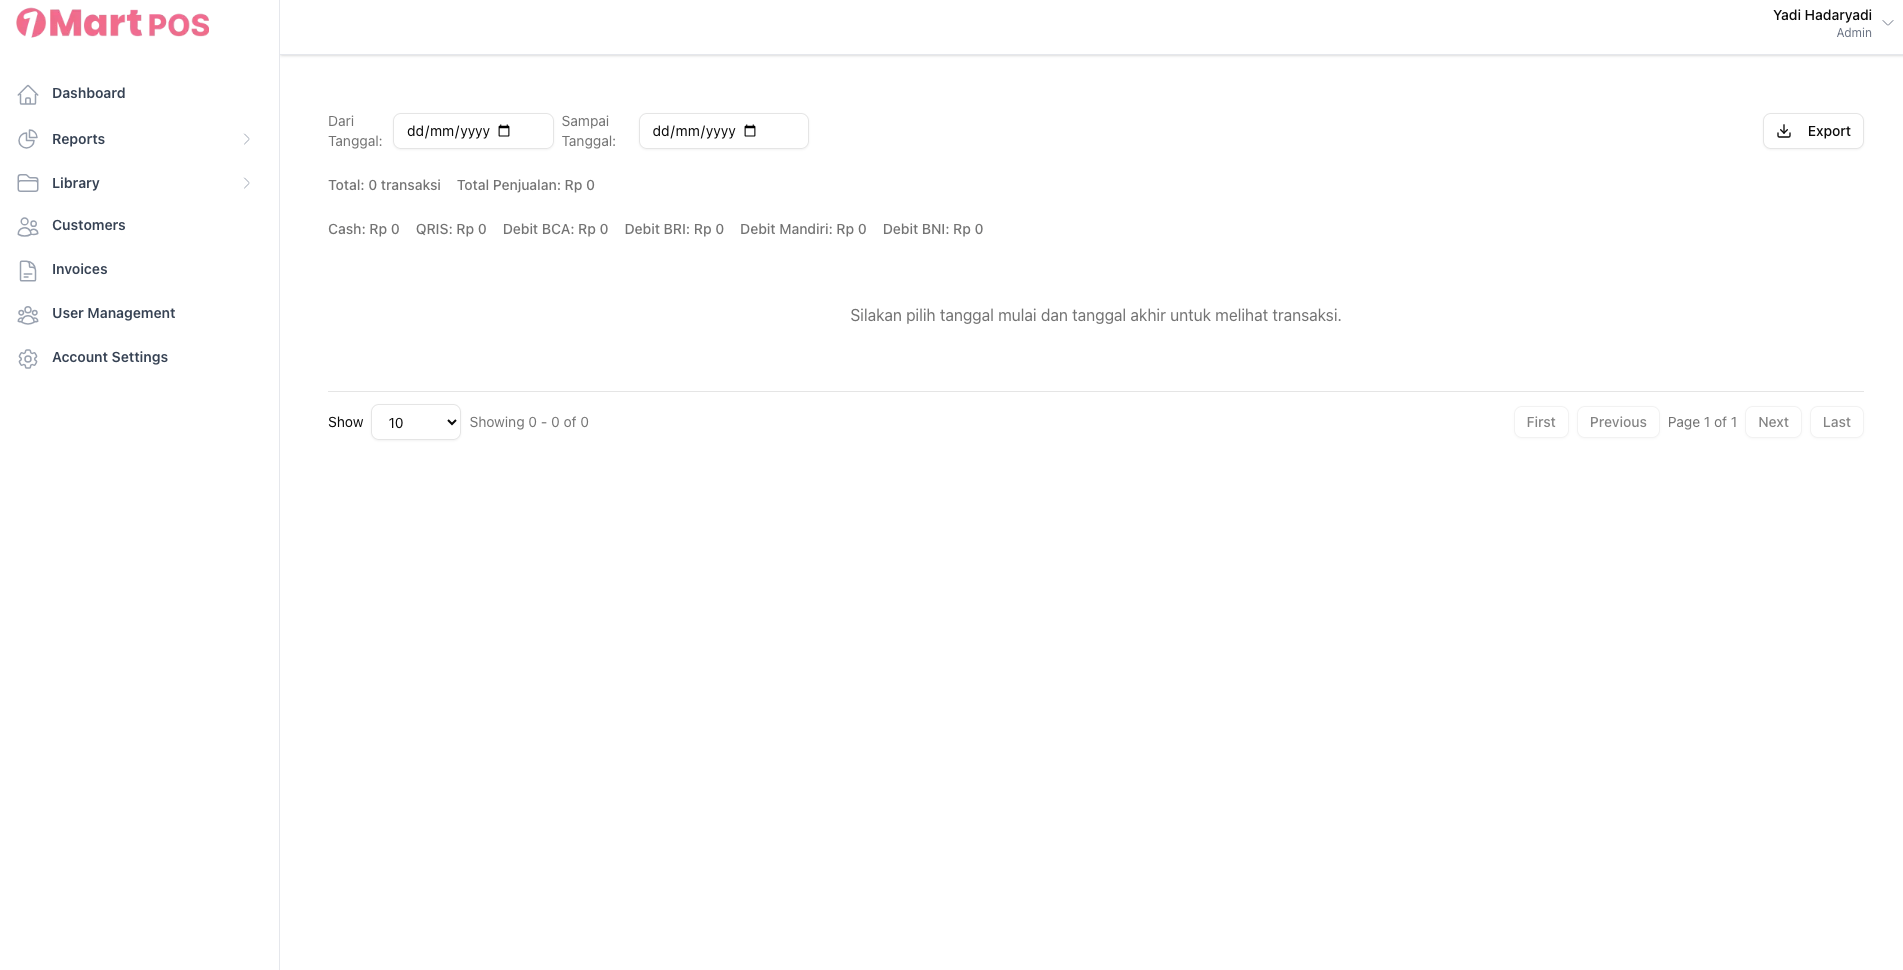
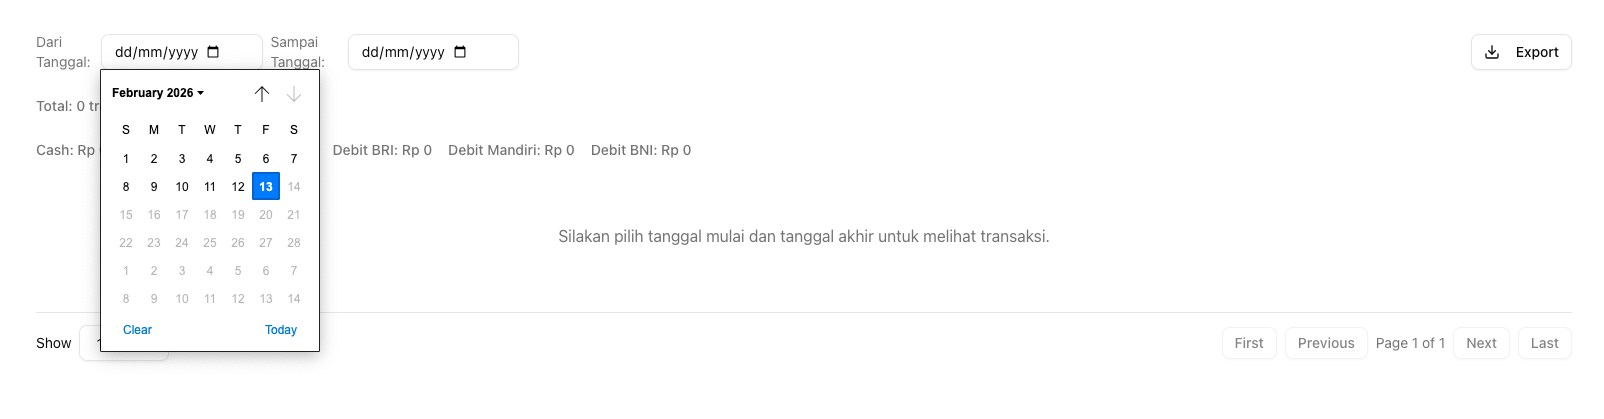
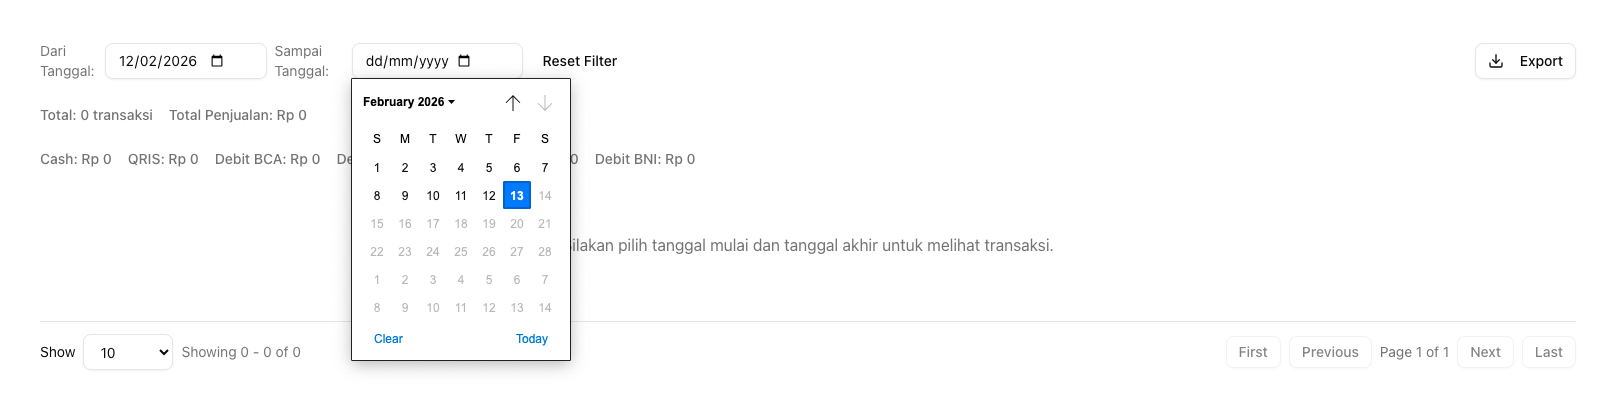
2. SIlahkan pilih tanggal transaksi untuk melihat rekap transaksi
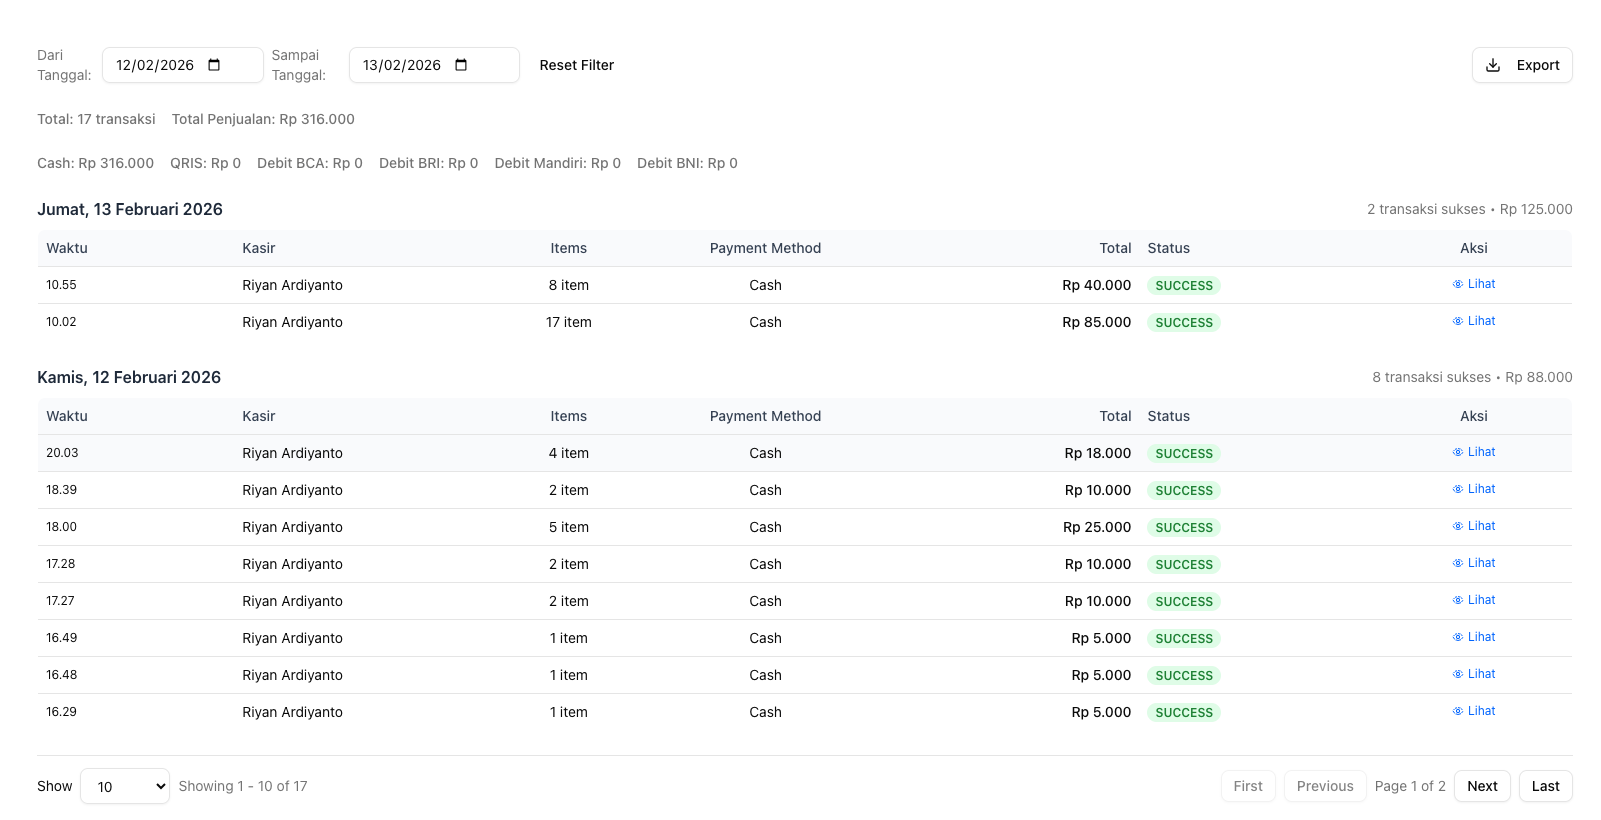
3. Klik tombol export untuk mengunduh file excel hasil transaksi untuk tanggal yang sudah dipilih
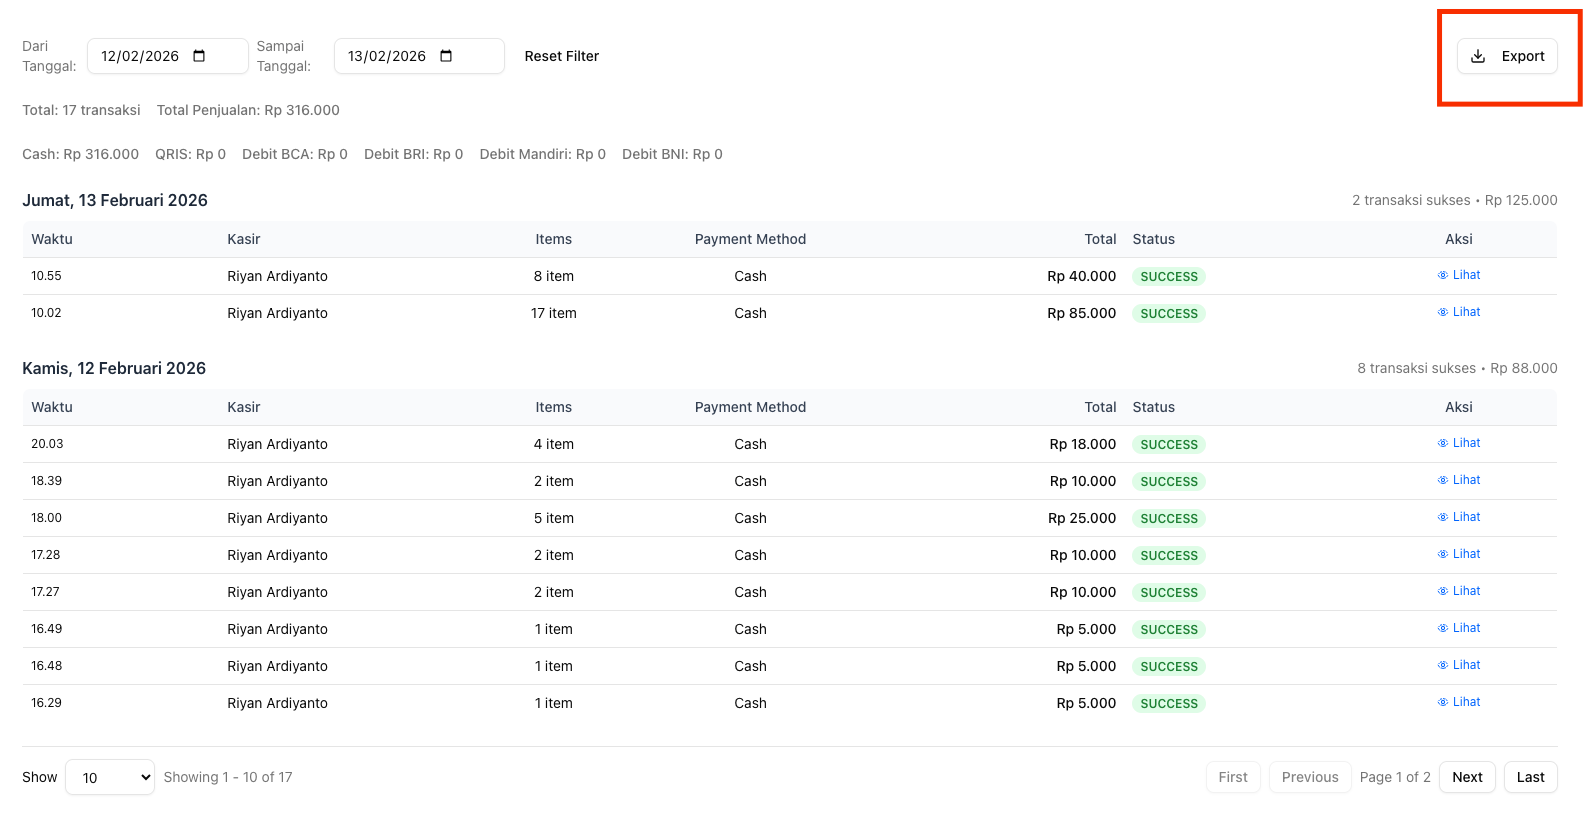
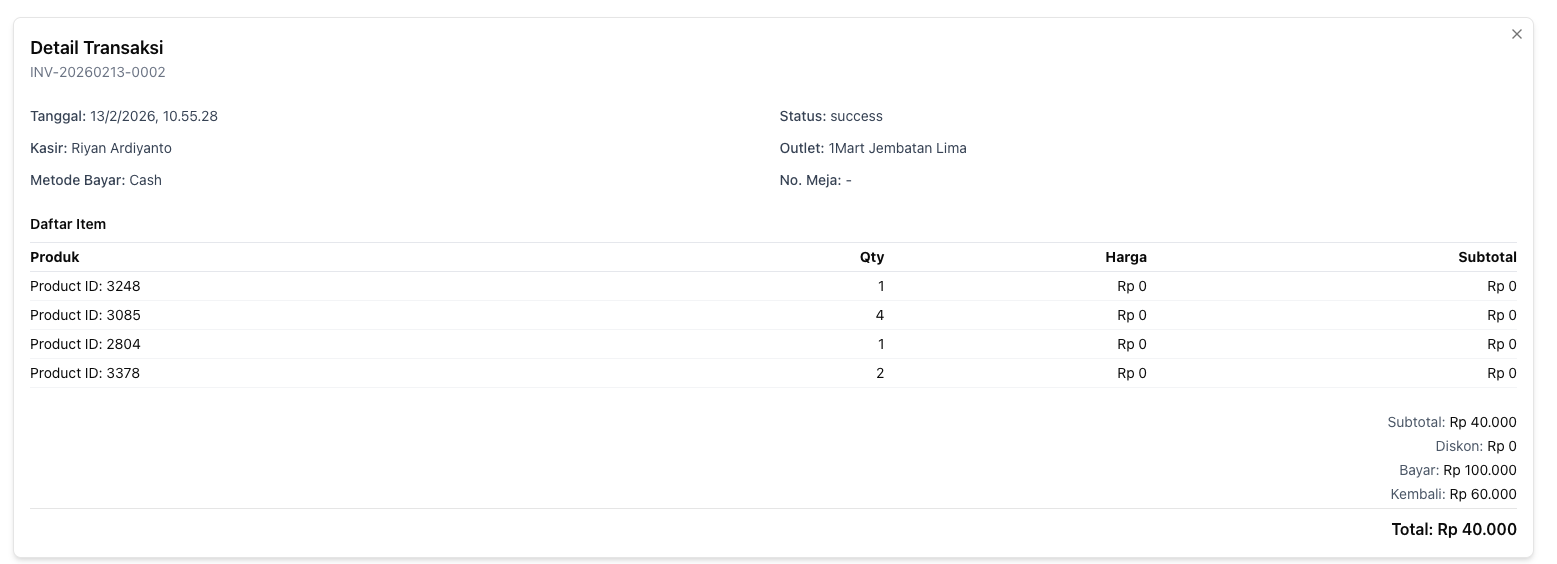
4. Klik tombol Lihat di setiap transaksi jika ingin melihat detail transaksi secara langsung

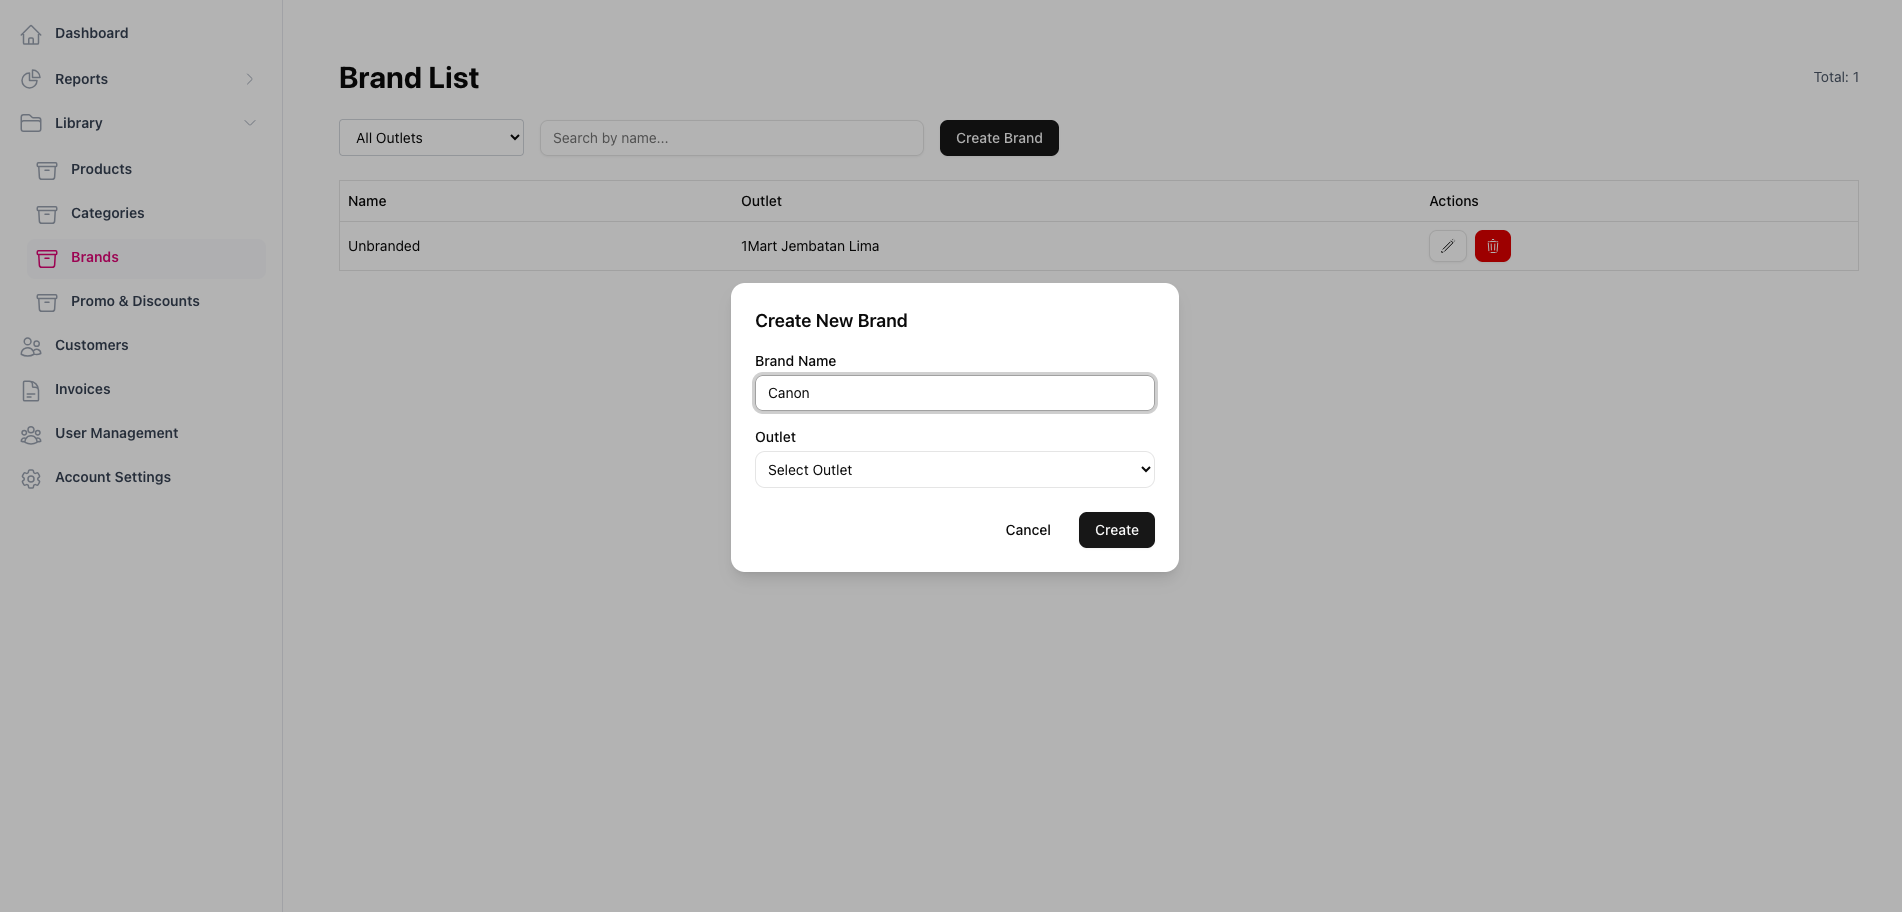
Brand
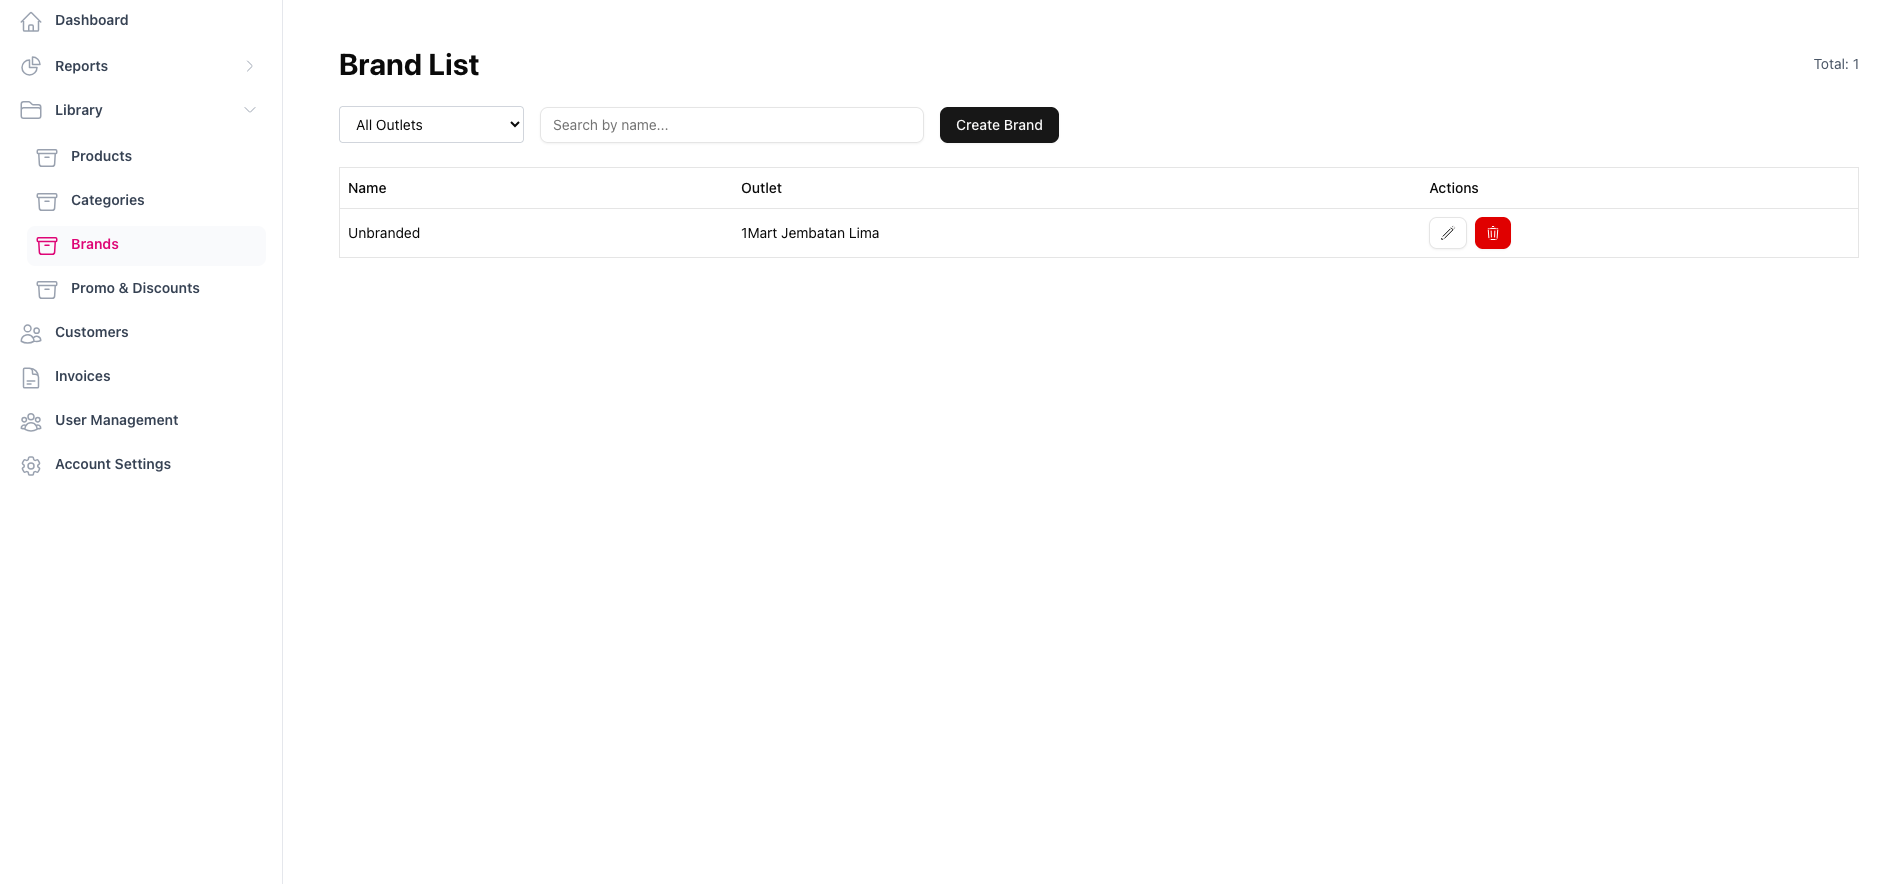
2. Klik tombol Create Brand
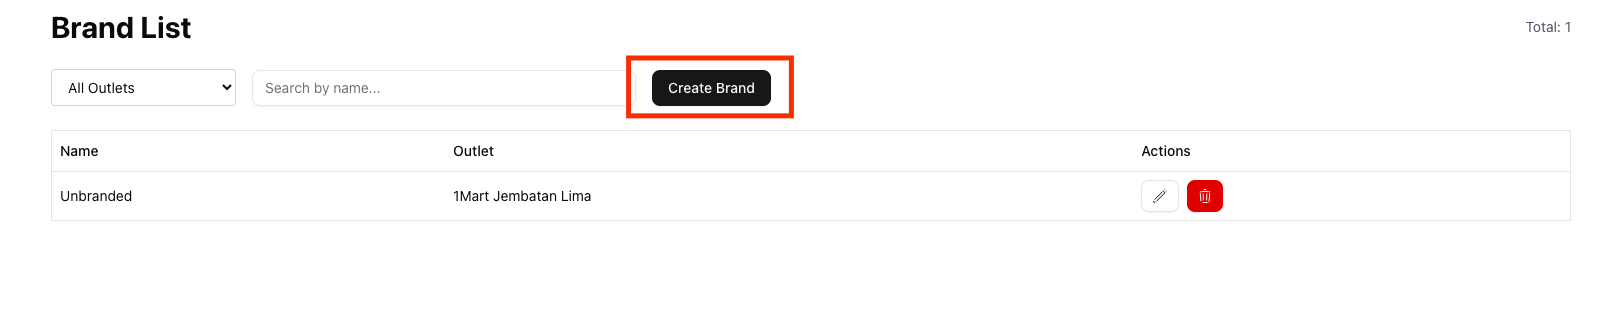
3. Silahkan isi nama brand dan pilih salah satu outlet yang tersedia
Category
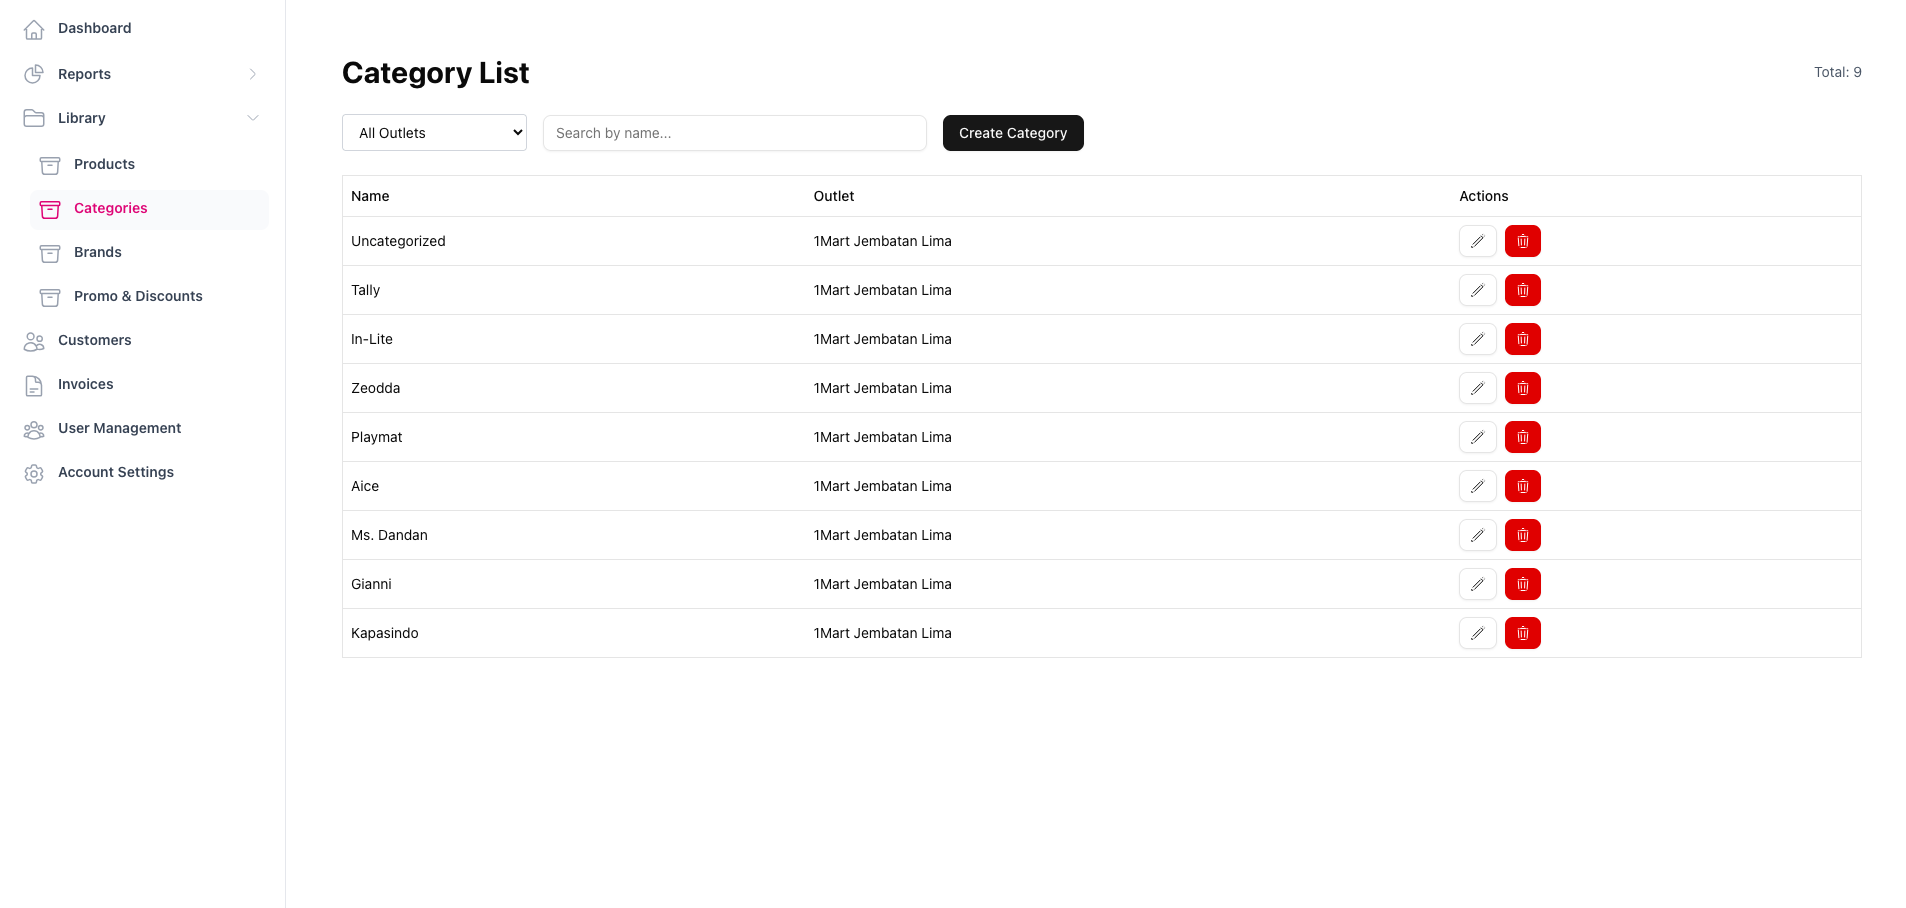
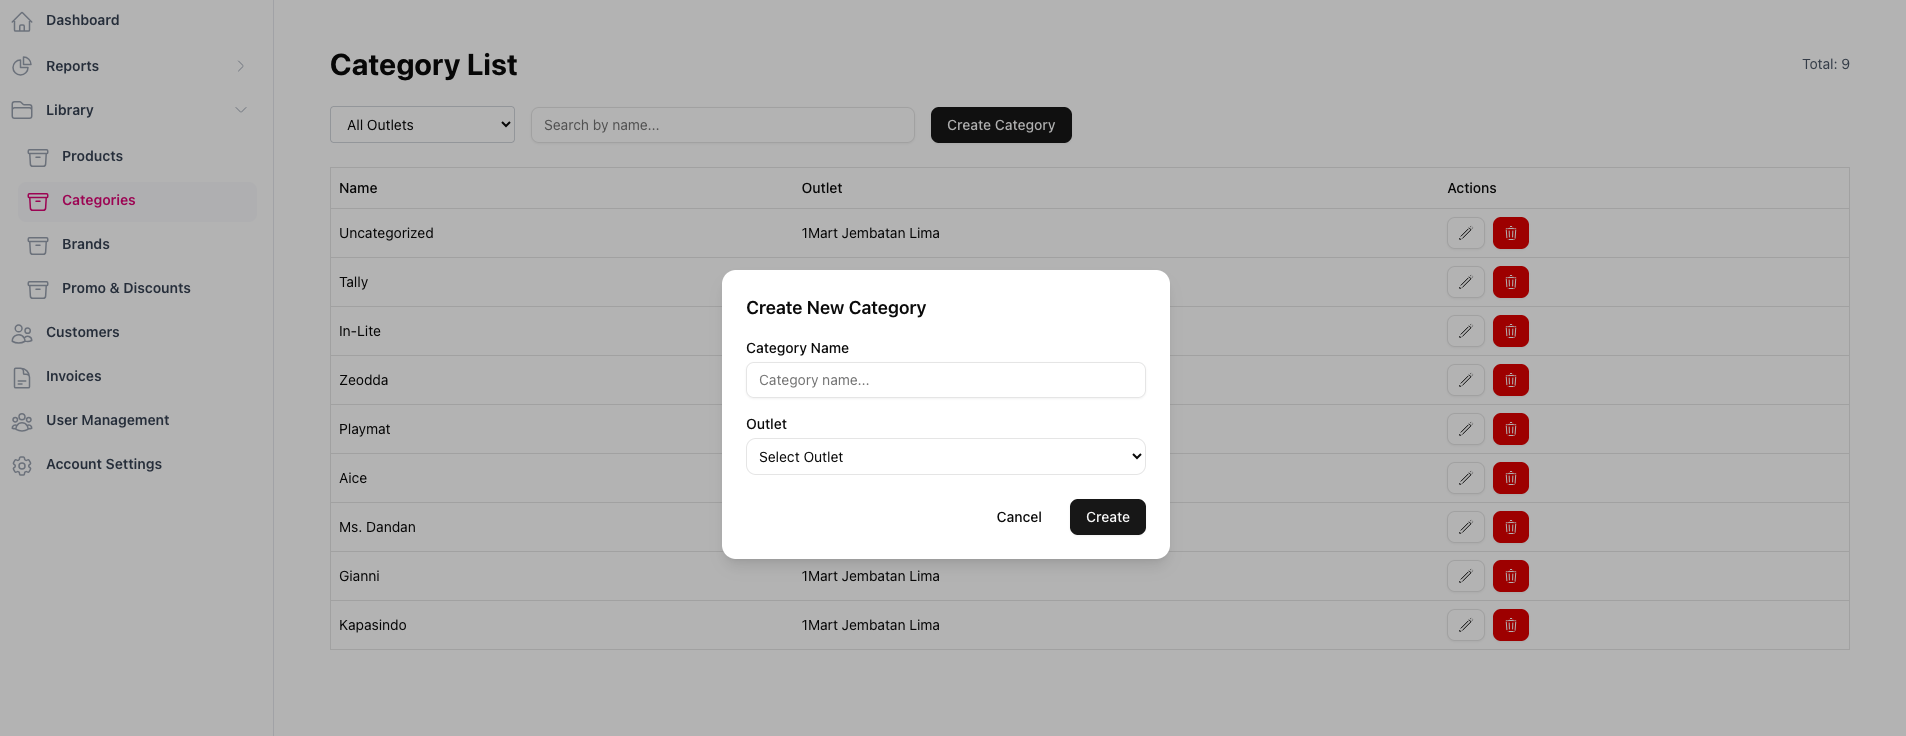
2. Klik tombol Create Category untuk membuat kategori barang

3. Silahkan isi nama kategori barang yang sesuai dan pilih salah satu outlet yang tersedia
Products
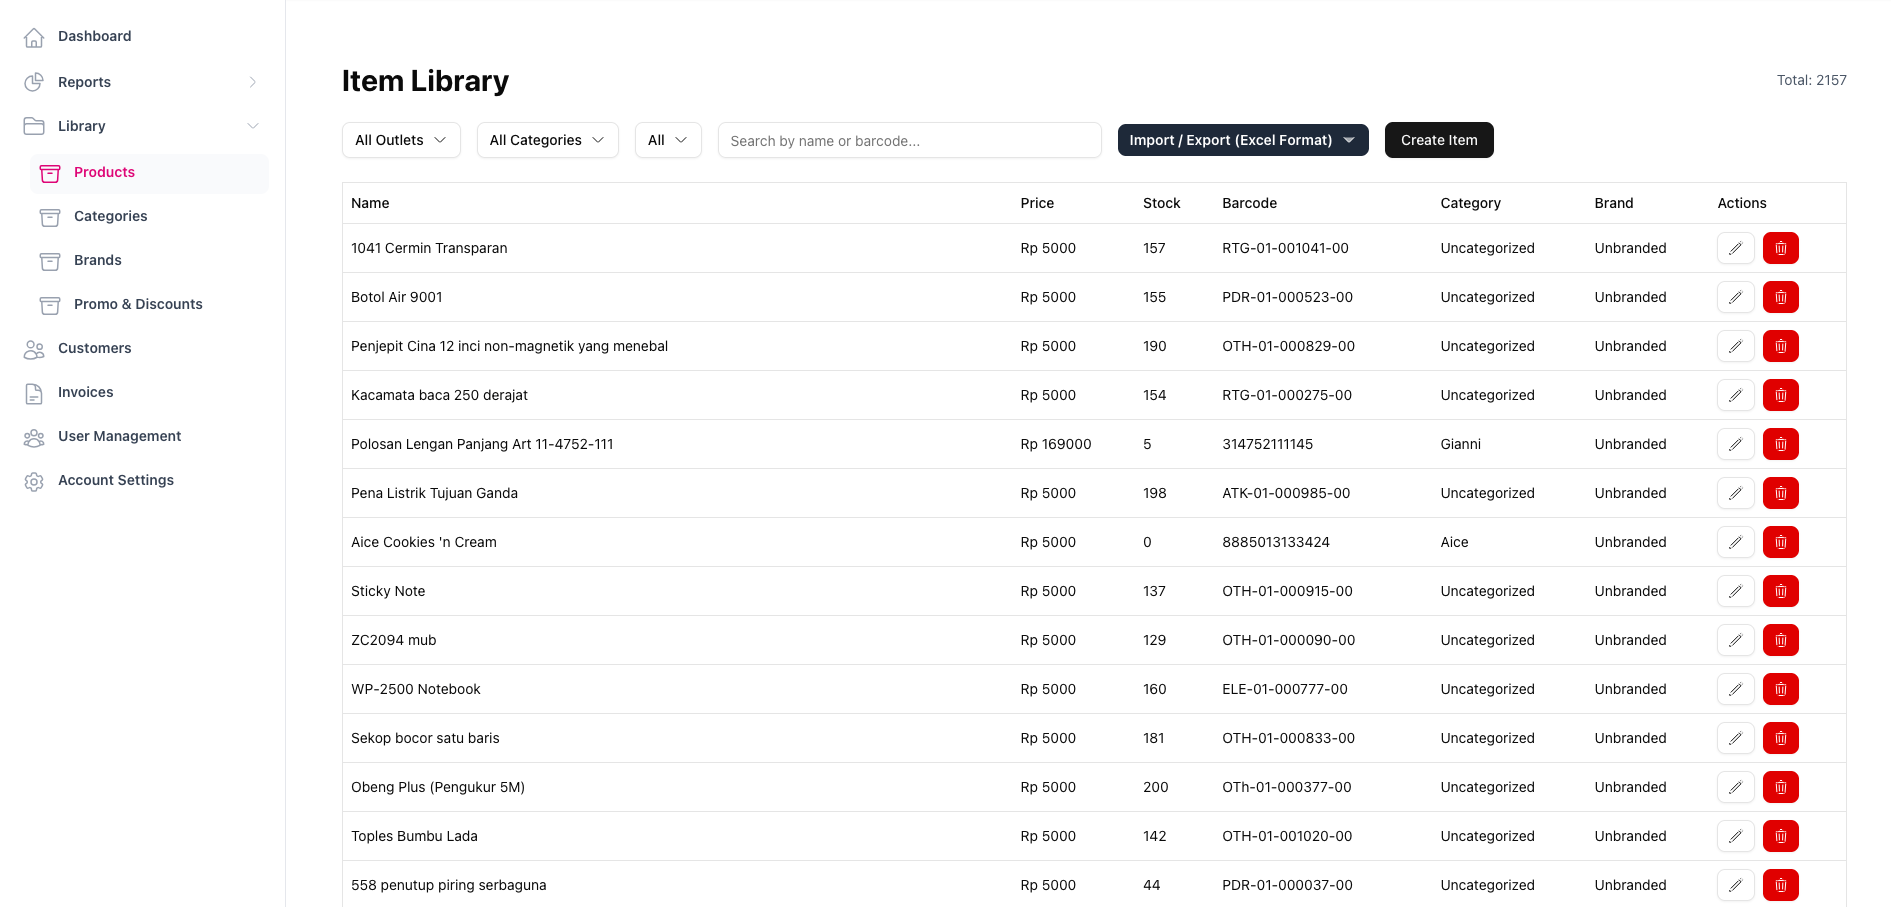
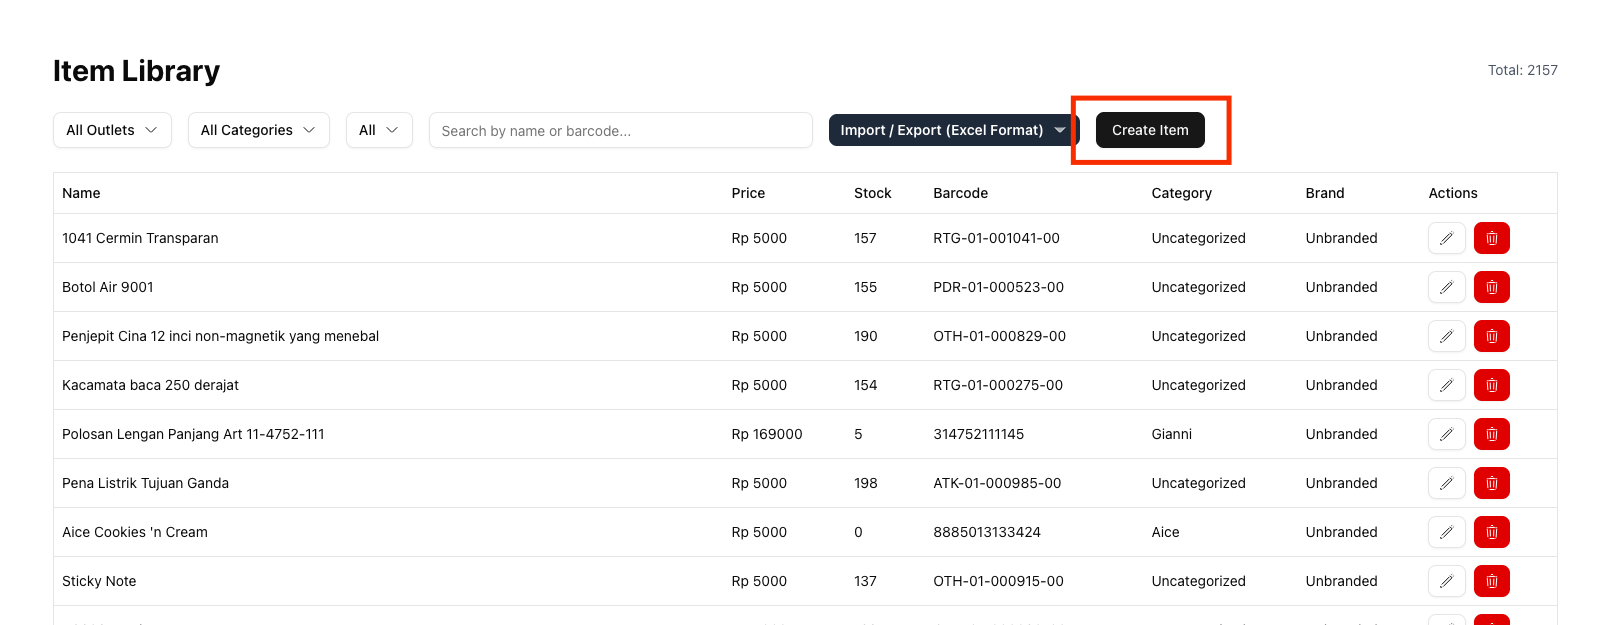
2. Untuk memasukkan produk yang ingin dijual secara satuan, silahkan klik tombol Create Item
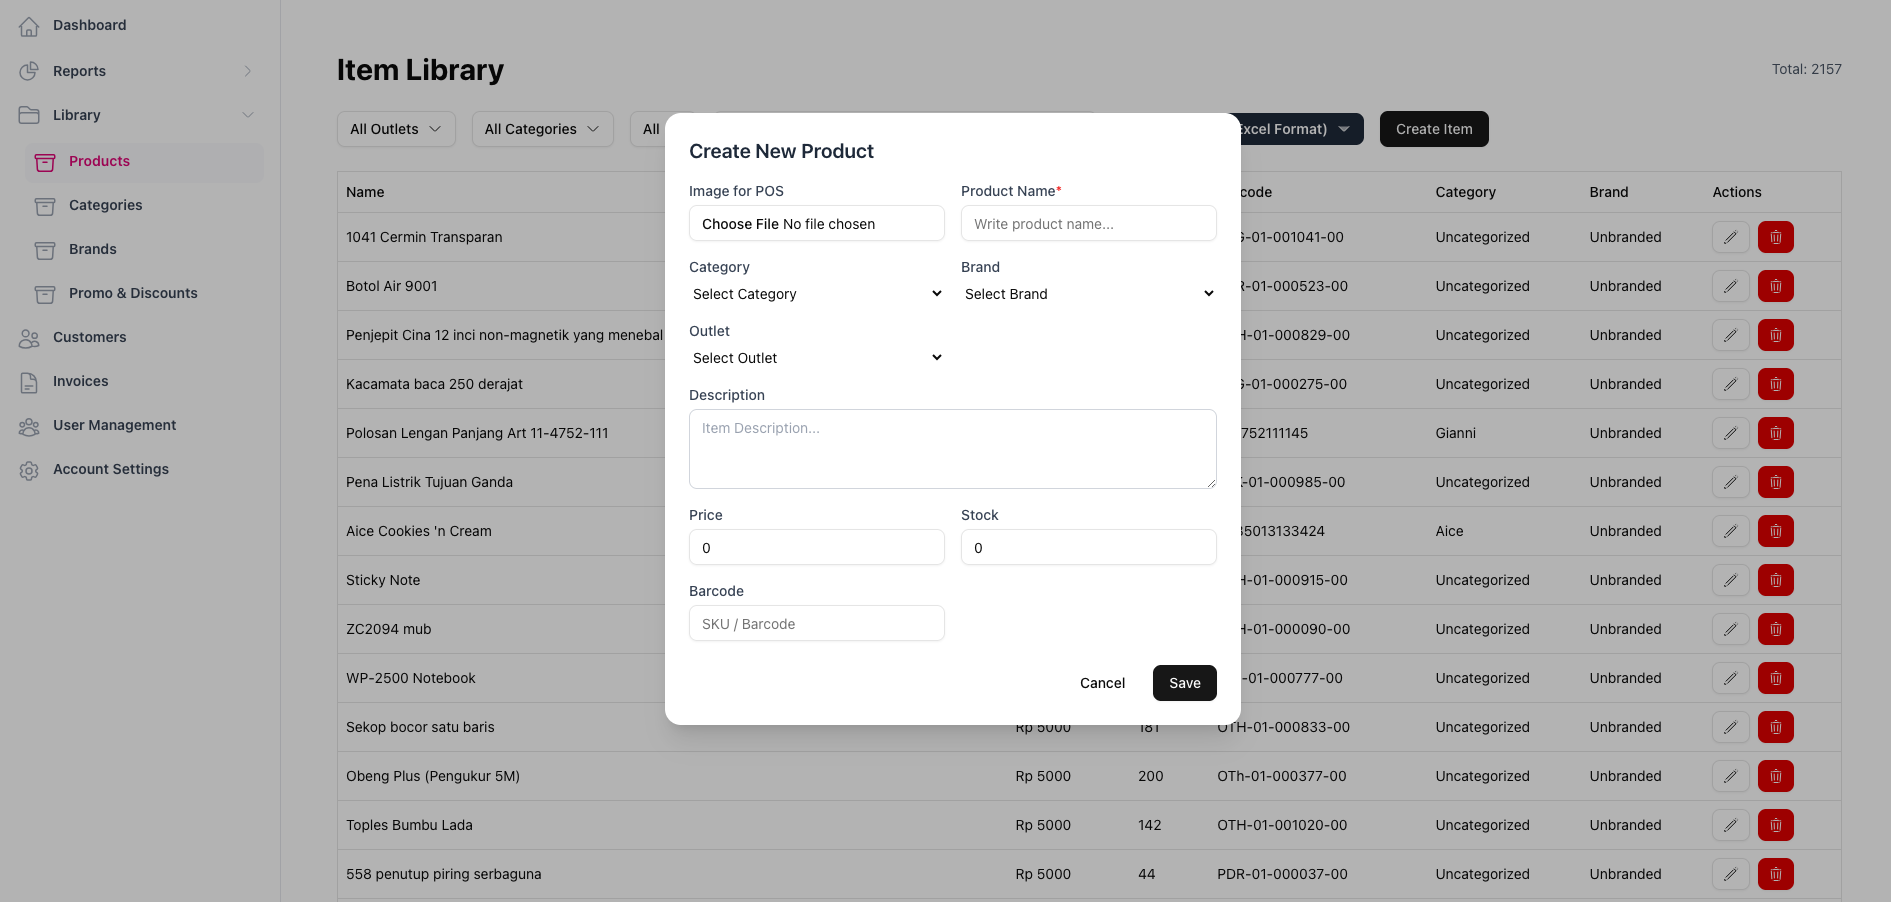
3. Silahkan isi kolom-kolom yang tersedia
Diwajibkan isi: Product name, Category, Brand, Outlet, Description, Price, Stock, Barcode
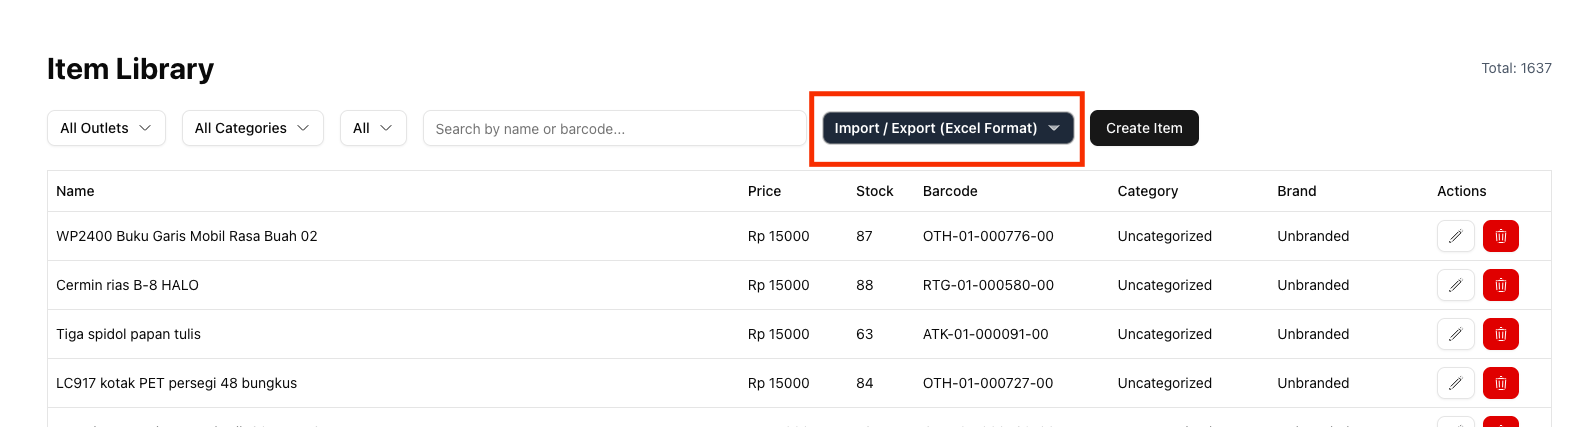
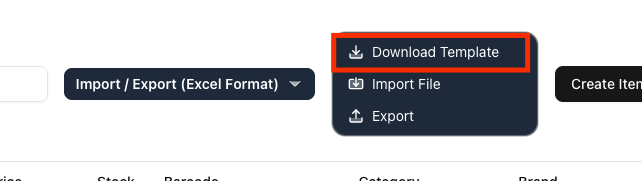
4. Jika ingin menambah banyak produk, silahkan klik Import / export (Excel Format) kemudian klik Download Template excel
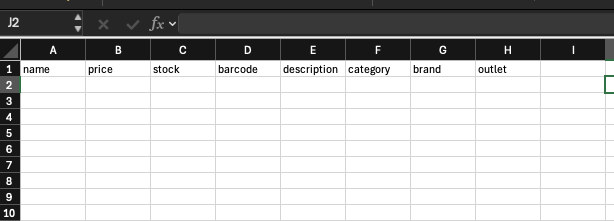
5. Silahkan isi kolom-kolom yang tersedia untuk menambahkan produk-produk
6. Kemudian klik tombol Export untuk mengunggah file excel produk
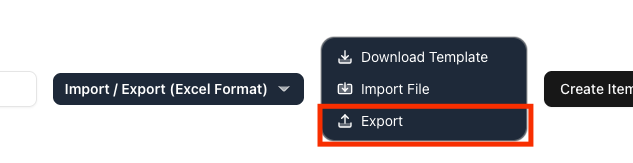
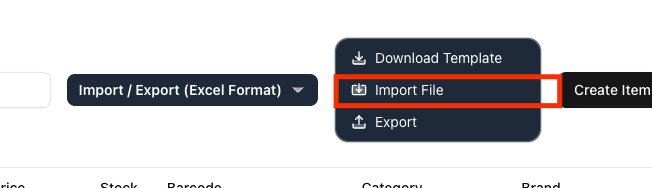
7. Untuk mengunduh produk-produk yang ada di outlet, silahkan klik Import File
Promos and discounts
2. Untuk menambah promo produk, silahkan klik Create Promo

3. Isi Nama promo, deskripsi promo, dan yang lainnya
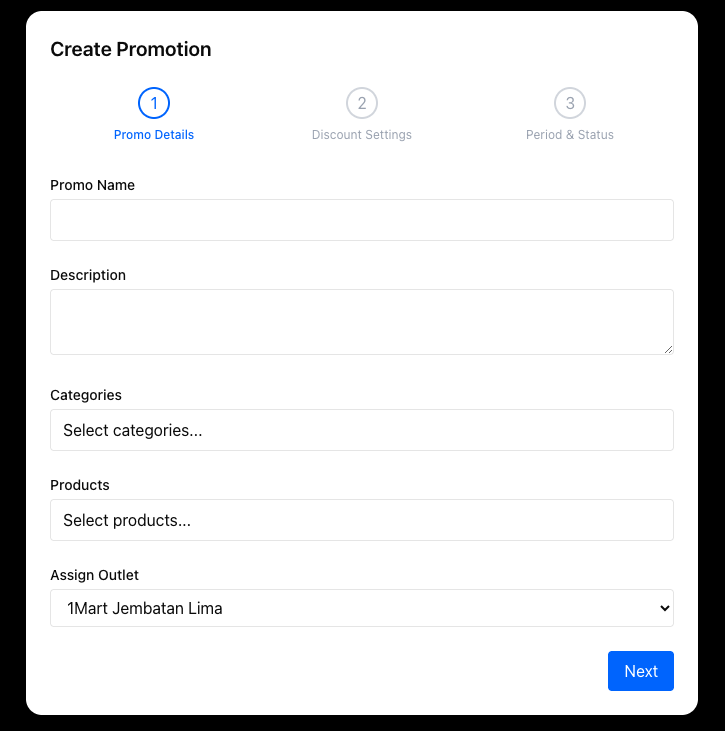
4. Silahkan pilih tipe diskon lalu jumlah diskon. Jika ingin dipotong berdasarkan persentase (contoh: 15%), silahkan isi Percentage lalu isi Discount Value.
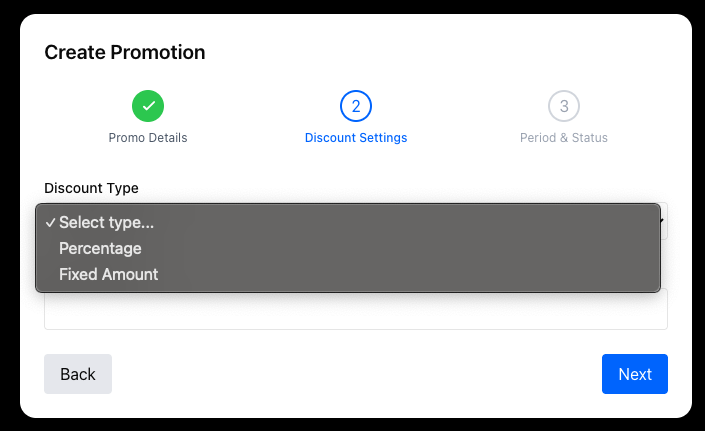
Tampilan awal Create Promo
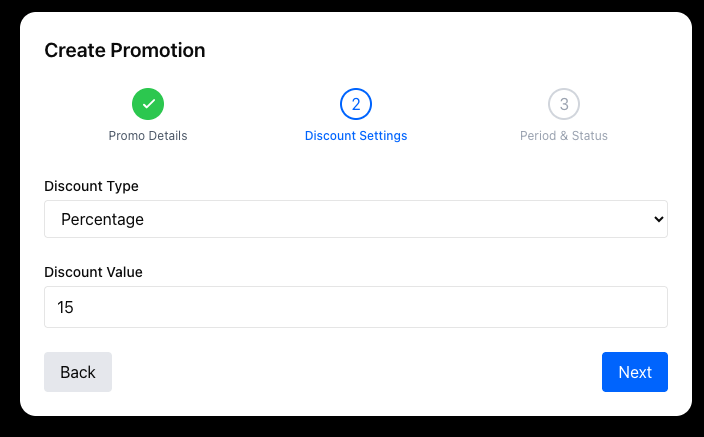
Tampilan promo jika ingin memberikan diskon 15%
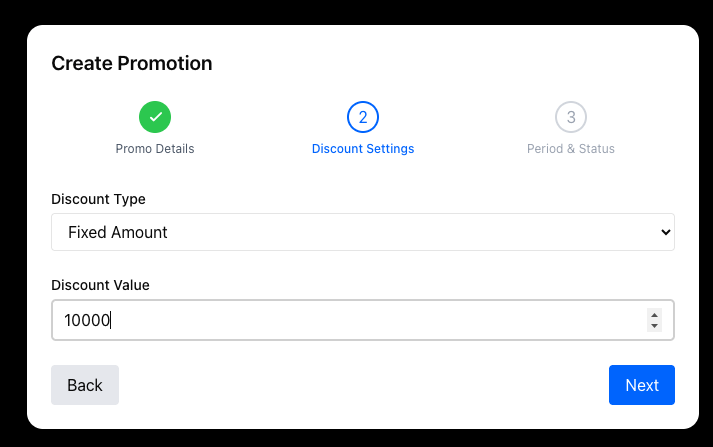
Tampilan promo jika ingin memberikan diskon Rp 15.000
5. Pilih tanggal promo dimulai, tanggal promo berakhir dan tombol switch Active untuk mengaktifkan promo
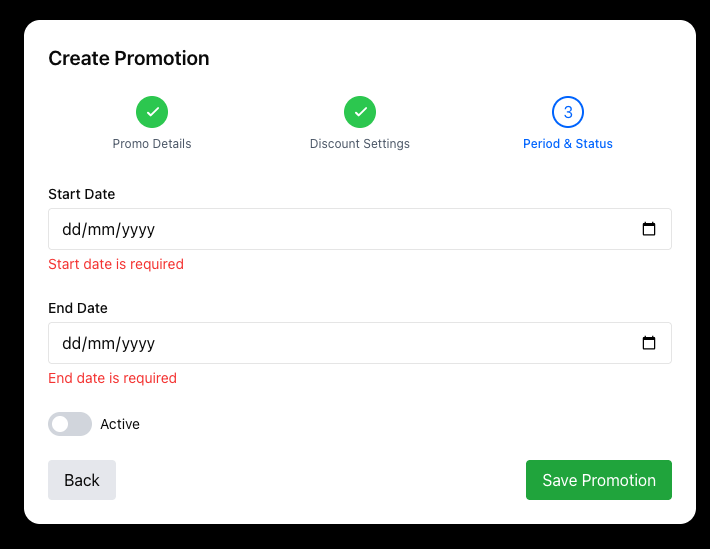
Jangan lupa mengakfikan tombol ACTIVE untuk mengaktifkan promo
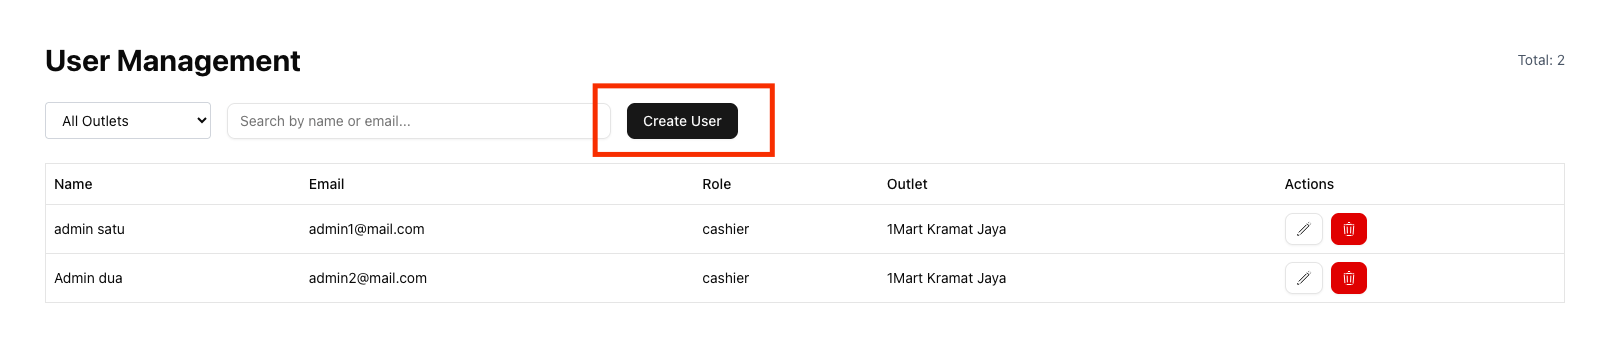
User management
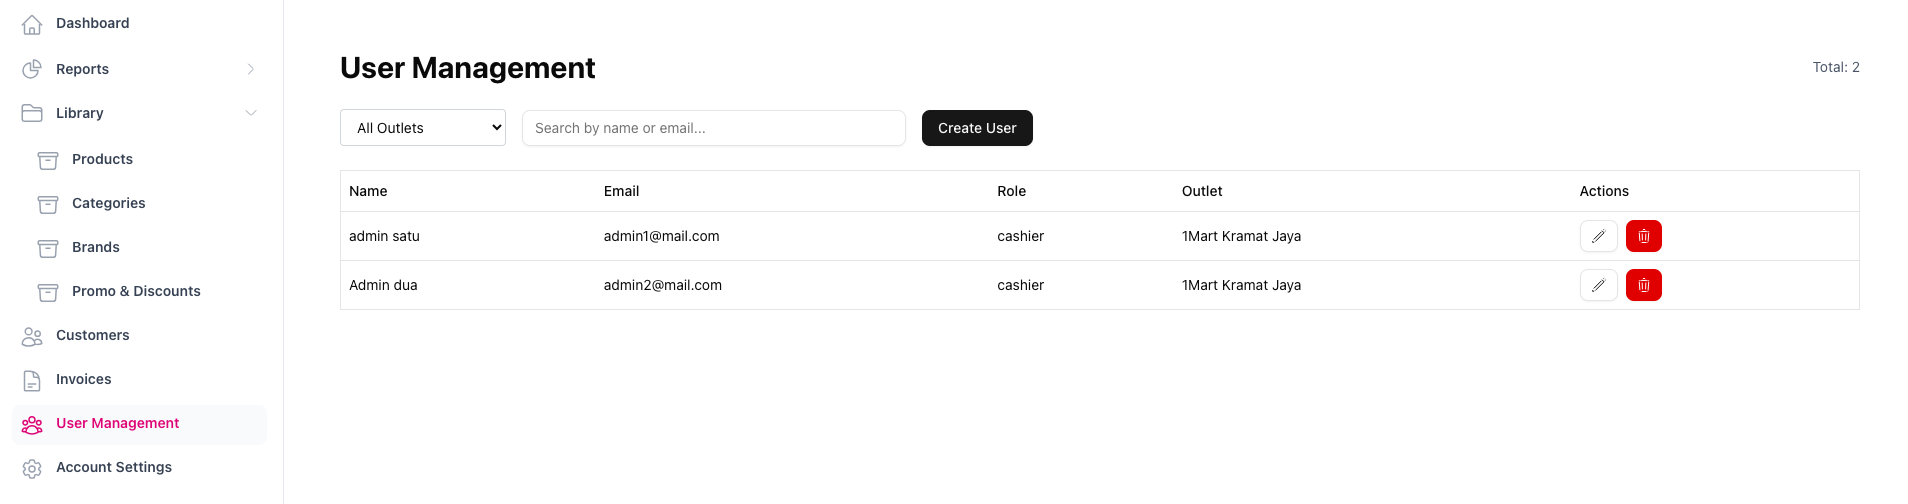
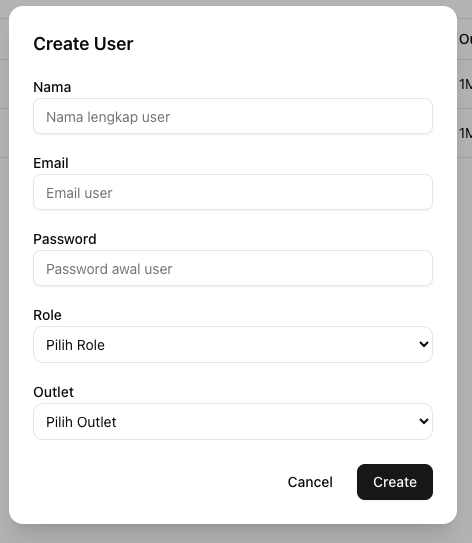
2. Klik tombol Create User untuk membuat akun
3. Isi nama, email, password, Role, dan outlet
User manual - Master admin
Manuals for 1MART POS for role Master Admin only
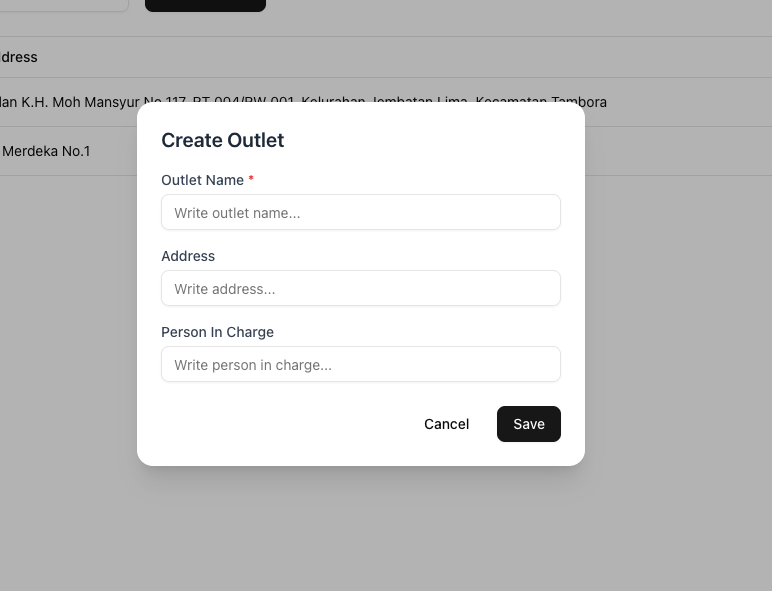
Outlet
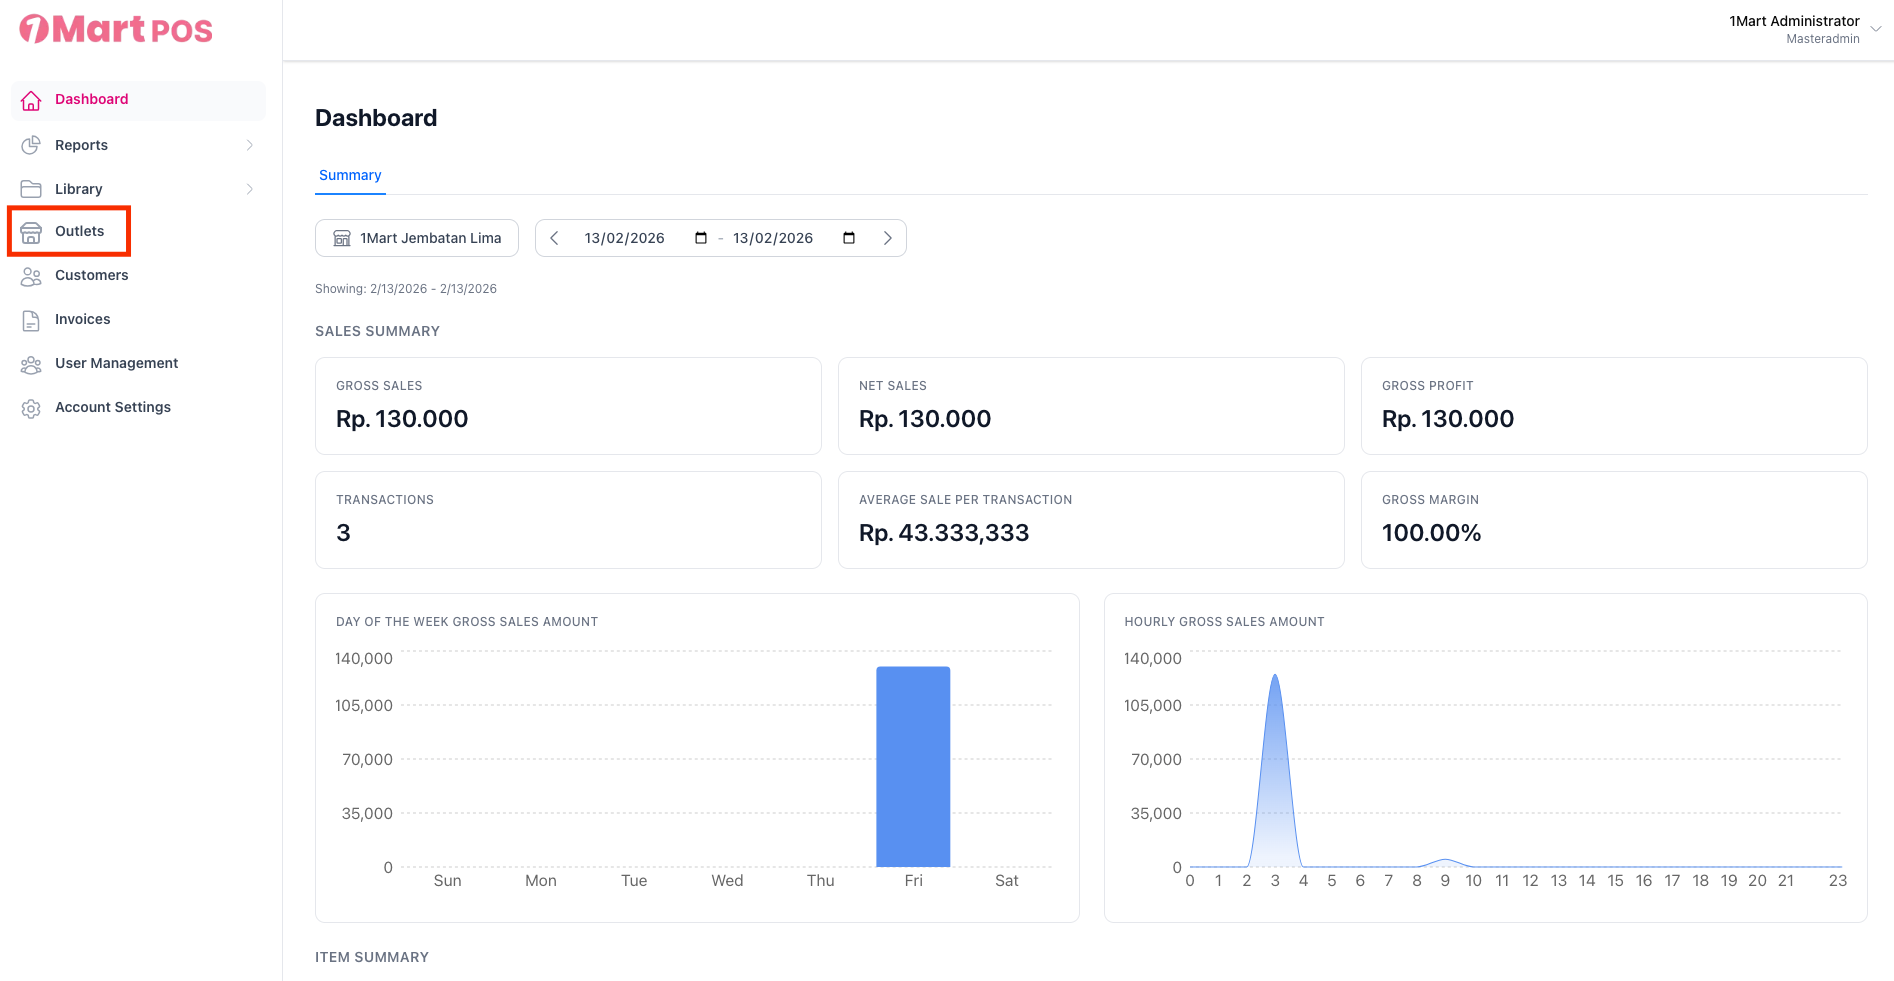
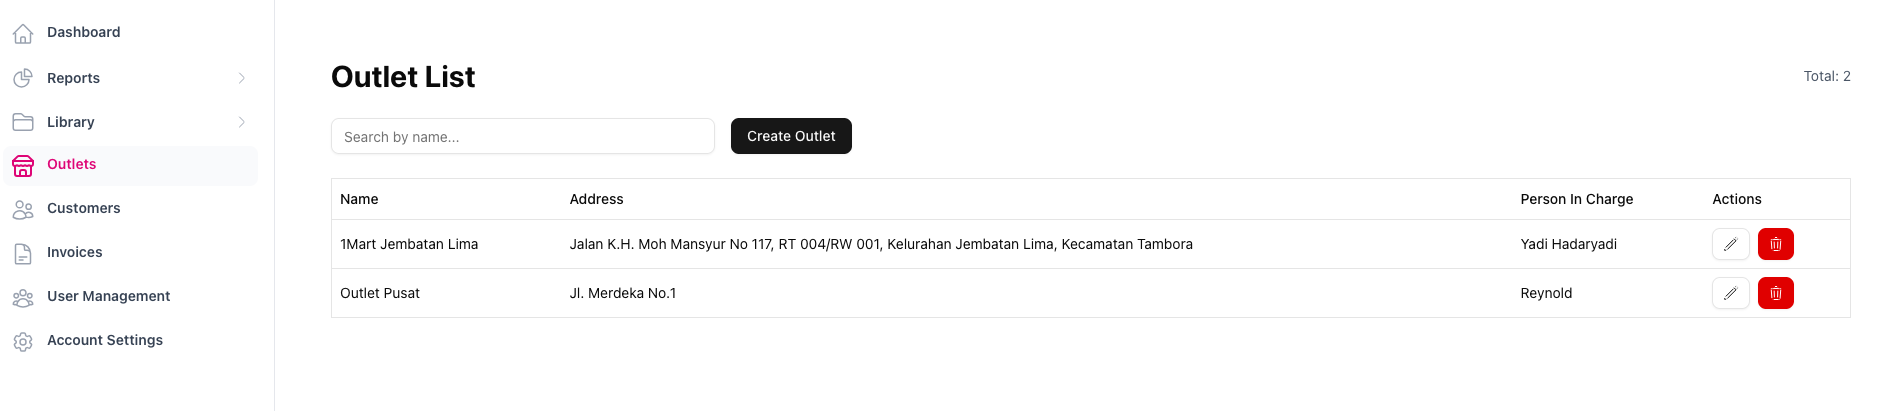
2. Klik tombol Create Outlet untuk membuat outlet 1Mart

3. Isi nama outlet, alamat outlet, dan Person In Charge (PIC) outlet tersebut